Welcome to Laser Pointer Forums - discuss green laser pointers, blue laser pointers, and all types of lasers

LPF Donation via Stripe | LPF Donation - Other Methods

Links below open in new window

ArcticMyst Security by Avery

Successfully changed the c-mount on my Aixiz 50mw

Brett

0
Joined
Nov 28, 2008
Messages
177
Points
0
Today I got my Aixiz 50mw labby working again.  It had died, first...due to failure of its mains powered switching supply.  I had then restored it to working order once again using my LM317 supply.  Unfortunately I ended up frying the c-mount, probably by disconnecting the module and reconnecting it before first discharging the tantalum cap.  However, this may not have been the case, since the output was weak and very unstable (compared to my two other dpss lasers) from the beginning on this unit.  I documented some of these frustrations in the original review thread for this laser:

http://www.laserpointerforums.com/forums/YaBB.pl?num=1228428998/0

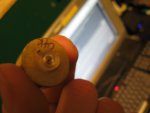
Nevertheless, everything else I've gotten from Aixiz has been better than cherry, so I'm not going to fly off the handle over this.  I'm someone who would rather try to modify and repair the thing than send it back for a replacement/refund, and that's exactly what I did.  I used a brand new 500mw 808nm cmount from Snoctony.  It arrived in an antistatic bag and with it's negative lead already tinned with a slight amount of solder.  I had scratched the brass back of the module on either side to help with alignment once I got the new diode installed.  This helped greatly as I tightened down the diode case screw.  The "-" lead was a cinch to solder with my 12w Weller.

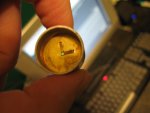
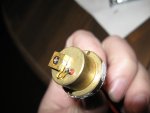
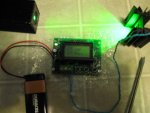
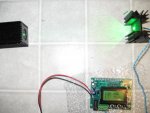
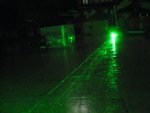
I used the power supply from my snoctony labby to test this laser.  To my surprise it fired up brightly.  I have taken this module completely apart and can now freely rotate the brass crystal mount (which is shaped a lot like a copper tubing endcap -- of course in this case it is made of brass) while the laser is running.  While the module is out of the heatsink like this the beam is expanded by a lens on the very front.  Once you slide it into the heatsink, the collimator kicks in and you can then align the beam in relation to the collimating/focusing lens.  There is a lot of chance to optimize here and I gained valuable DPSS experience.

Anyone who has taken this laser apart will probably know what I'm talking about here....if anyone is interested, I have some pics I can provide.

-Brett


Brett

0
Joined
Nov 28, 2008
Messages
177
Points
0
Re: Successfully changed the c-mount on my Aixiz 5

Here's a beamshot of the restored laser...it's much brighter than it was when I got it....although when I got it, it was definately running under spec. Now it's super bright. When the laserbee arrives, it'll be sweet.
 

Attachments

  • Aixiz_rebuild_beamshot.jpg
    Aixiz_rebuild_beamshot.jpg
    178.4 KB · Views: 707

JLSE

1
Joined
Dec 13, 2007
Messages
3,580
Points
0
Re: Successfully changed the c-mount on my Aixiz 5

Brett Miller said:
Here's a beamshot of the restored laser...it's much brighter than it was when I got it....although when I got it, it was definately running under spec.  Now it's super bright.  When the laserbee arrives, it'll be sweet.


I got a similar labby from a scanner I bought, 500mW c-mount and all. With the pot turned up it puts out 120mW of 532. Id say replace the 500mW with a 1W, and slowly turn up the power watching the output.

Mine hits a slump at just above 120mW, and am not sure where the weakness is, the crystals or the pump :-/

Nice work, love to see DPSS being experimented with around these parts. Theres just not enough of it ;)
 

Brett

0
Joined
Nov 28, 2008
Messages
177
Points
0
Re: Successfully changed the c-mount on my Aixiz 5

wannaburn said:
I got a similar labby from a scanner I bought, 500mW c-mount and all. With the pot turned up it puts out 120mW of 532. Id say replace the 500mW with a 1W, and slowly turn up the power watching the output.

Mine hits a slump at just above 120mW, and am not sure where the weakness is, the crystals or the pump :-/

Nice work, love to see DPSS being experimented with around these parts. Theres just not enough of it ;)

Thanks...you know I'm interested in DPSS experimentation!  :cool:

The module in question is the one I showed you in its disassembled form in those pictures I sent you via email in that zip file.  It's really cool to observe what happens to the unfocused spot when the crystal set is rotated.  Until my LaserBee arrives, I can't really justify doing much optimization beyond what I described above, since I really need quantification of power output, so I can know if my changes are increasing or decreasing output.

-Brett
 
Joined
Nov 7, 2008
Messages
5,725
Points
0
Re: Successfully changed the c-mount on my Aixiz 5

Good stuff! I was wondering how good the alignment would be after replacing the diode..

A 1W pump is a great idea, but you can only pump crystals this size with so much power before they flatline or eventually reach their damage threshold. 120mW max is about what I'd expect from a crystal most likely rated at 50-60mW. Don't know if I'd go much higher than 1W in though..
 
Joined
May 24, 2007
Messages
283
Points
0
Re: Successfully changed the c-mount on my Aixiz 5

wannaburn said:
[quote author=Brett Miller link=1231902333/0#1 date=1231902408]Here's a beamshot of the restored laser...it's much brighter than it was when I got it....although when I got it, it was definately running under spec.  Now it's super bright.  When the laserbee arrives, it'll be sweet.


I got a similar labby from a scanner I bought, 500mW c-mount and all. With the pot turned up it puts out 120mW of 532. Id say replace the 500mW with a 1W, and slowly turn up the power watching the output.

Mine hits a slump at just above 120mW, and am not sure where the weakness is, the crystals or the pump :-/

Nice work, love to see DPSS being experimented with around these parts. Theres just not enough of it ;)[/quote]

a 1 watt diode wil most likely kill or overheat the crystals and the small laserhead wil probably not be able to get rid of the heat
Also the diode has to remain at +/- 20-25 degrees to keep emiting at 808nm
so pumping efficiency wil drop when the diode heatsup above 35 degrees.
Thats also why high power green modules have tecs
its to keep them at a steady temperature in most high power lasers also the ktp assy is kept at 25-35 degrees since kpt's like to be warm
But ofcourse also not to warm

Every decent 100mw + green module is normaly tec stabilised
 

Benm

0
Joined
Aug 16, 2007
Messages
7,896
Points
113
Re: Successfully changed the c-mount on my Aixiz 5

Regulating the temperature of the pump, and ideally each crystal individually, can greatly improve overal efficiency, but is also hard to retrofit.

I'd be careful just upping the pump power, you could damage the crystals, but also the (anti)reflective coatings on them rendering the whole thing inoperable.
 

Brett

0
Joined
Nov 28, 2008
Messages
177
Points
0
Re: Successfully changed the c-mount on my Aixiz 5

Benm said:
Regulating the temperature of the pump, and ideally each crystal individually, can greatly improve overal efficiency, but is also hard to retrofit.

I'd be careful just upping the pump power, you could damage the crystals, but also the (anti)reflective coatings on them rendering the whole thing inoperable.

The Vanadate should be cooled and the KTP heated and kept its optimum temperature, if I recall correctly.  I do have a few TEC's, and I plan on trying this in the future, but this particular laser, being designed for Hybrid Casix type sets, really doesn't lend itself to this design.  I am really in the stage of just gaining experience right now, in areas such as alignment and pump diode installation.

Elektrofreak:  I made a mistake when I took apart the module initially.  I had marked the rear piece on either side of the c-mount to help with its alignment.  However, in my haste to take the rest of the laser apart, I didn't note the orientation of the brass piece that held crystal set.  However, lining this up wasn't as difficult as I thought.  Then once the brass module was reassembled and inserted into the heat sink, I didn't tighten the hex set screw until the beam was lined up as close to the center of the final lens as I could get it.  Initially this part of the alignment was quite poor and there was an artifact to the left of the spot where some of the beam was being blocked by the aluminum.

Here's a picture of the exploded module with parts separated:
 

Attachments

  • aixiz_module_parts_2.jpg
    aixiz_module_parts_2.jpg
    190.4 KB · Views: 855

Brett

0
Joined
Nov 28, 2008
Messages
177
Points
0
Re: Successfully changed the c-mount on my Aixiz 5

Here's a picture of the cap I mentioned that contains the crystal set on one side, and the beam expanding lens on the other:
 

Attachments

  • aixiz_crystal_set.jpg
    aixiz_crystal_set.jpg
    120.3 KB · Views: 695

Brett

0
Joined
Nov 28, 2008
Messages
177
Points
0
Re: Successfully changed the c-mount on my Aixiz 5

Here's the other side, with the beam expander. Next in line after that is the focusing lens on the front of the Aixiz heat sink.


Attachments

  • aixiz_crystal_set2.jpg
    aixiz_crystal_set2.jpg
    109.2 KB · Views: 503

Brett

0
Joined
Nov 28, 2008
Messages
177
Points
0
Re: Successfully changed the c-mount on my Aixiz 5

One final picture...the c-mount and its brass holder. It was actually very easy to replace. Someone recently said on another thread, something to the effect of "The c-mount isn't for hobbyists". I disagree.


Attachments

  • Aixiz_c-mount.jpg
    Aixiz_c-mount.jpg
    560 KB · Views: 3,469

Brett

0
Joined
Nov 28, 2008
Messages
177
Points
0
Re: Successfully changed the c-mount on my Aixiz 5

I did a 5 minute power measurement on my modded Aixiz 50 (my LaserBee I came today!!!).  It's pretty cold here today, so it could probably reach higher powers over a 15 minute warmup so as to allow the KTP to reach optimum temp.  In any case, this gives me a ballpark figure for comparison with my other DPSS lasers.

...you can see the screwdriver sitting there which I had just used to attach the thermopile. It's great to finally have a LaserBee!!! Thanks Jerry!
 

Attachments

  • Aixiz_50_restored2.jpg
    Aixiz_50_restored2.jpg
    152.3 KB · Views: 408

Brett

0
Joined
Nov 28, 2008
Messages
177
Points
0
Re: Successfully changed the c-mount on my Aixiz 5

ElektroFreak said:
Great work for sure! +1

Thank you ElektroFreak!!  Here it is after last night, when I turned up the pot on the Snoctony driver I was powering it with. It's the most powerful 532nm laser I've owned now...it's burns electric tape like it's nothing and who knows what else. I've found that goggles are really handy for centering the spot on the Laserbee Thermopile...safer and easier.
 

Attachments

  • pot_modded_005.jpg
    pot_modded_005.jpg
    166.4 KB · Views: 287
Joined
Sep 20, 2008
Messages
17,622
Points
113
Re: Successfully changed the c-mount on my Aixiz 5

Brett Miller said:
I did a 5 minute power measurement on my modded Aixiz 50 (my LaserBee I came today!!!).  It's pretty cold here today, so it could probably reach higher powers over a 15 minute warmup so as to allow the KTP to reach optimum temp.  In any case, this gives me a ballpark figure for comparison with my other DPSS lasers.

...you can see the screwdriver sitting there which I had just used to attach the thermopile.  It's great to finally have a LaserBee!!!  Thanks Jerry!

You're more than welcome.... Brett... ;)

That is one impressive repair/build...

Now I have a good idea of what my 532nm labbys look like inside..

Jerry
 

disma

0
Joined
Sep 23, 2007
Messages
526
Points
18
Re: Successfully changed the c-mount on my Aixiz 5

wow, I was under the impression that the heat sink with the crystals in it was part of the whole thing, I didn't see a way to take the crystals out of it, what did you have to do to get the crystals out? :-? Where is the set screw? In a hole in the bottom?


Top