- Joined
- Nov 2, 2012
- Messages
- 626
- Points
- 43
I finally got most of my dead SkyLaser 405nm apart. This one died the LED death last Christmas. I like my SkyLasers, they're a lot of fun, but god help your soul if one dies, because they are ridiculously GLUED to hell inside. Acetone got rid of most of it, but still not enough. Since the diode was already dead I used a propane torch to carefully heat up the host parts and melt the glue. At that point I was able to disassemble the focusing head.
The most interesting thing I found was the heatsink and the way the heatsink is designed. I'm still interested in building custom, high-quality Laser 301/303's, and I think this type of heatsink would really simplify a 303 build. The flat part of the heatsink is already a perfect press-fit for the 303 host, just add a tiny (TINY!) dab of thermal epoxy to hold it in place. MUCH better than the stock 303 heatsinking!
Maybe this general design would simplify other builds too.
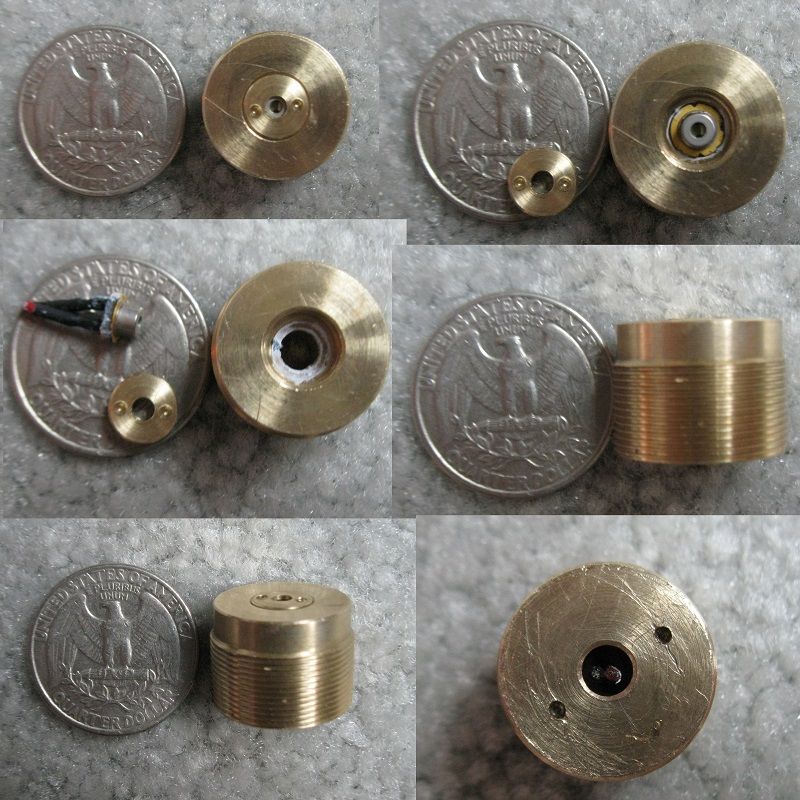
Here is the heatsink, have a look - basically a big 5.6mm diode module, solid brass:

The diode leads exit out the back of the heatsink and can be positioned as needed.
The diode retaining ring's thread is smaller than M9 but the thread pitch is the same. I would guess it's an M8x0.5 thread, or maybe an M7x0.5. It's the same size thread as the lens holder ring on the Techhood/Fasttech 532nm DPSS modules, if that helps.
As a bonus, the retaining ring prevents the lens from contacting the diode under any circumstances, so no need to worry about crushing the diode window due to improper lens adjustment.
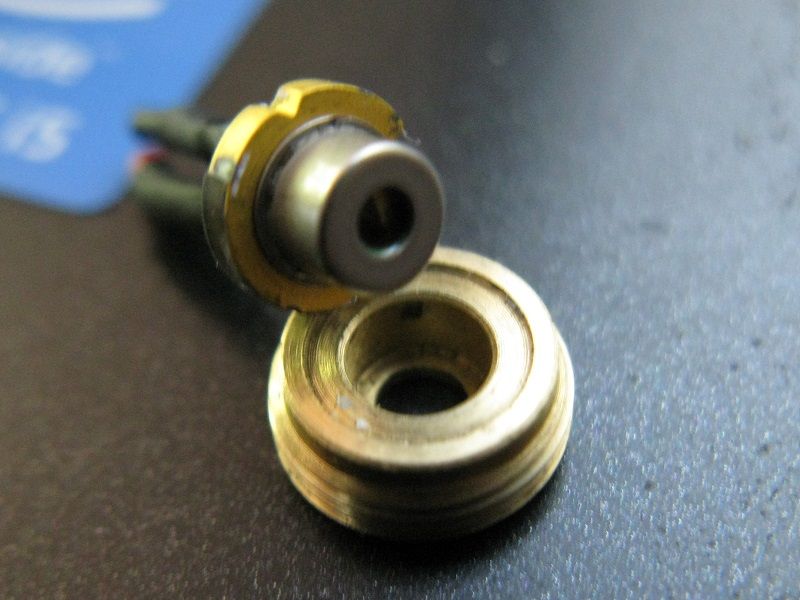
The inside of the retaining ring is sized and shaped to closely fit the laser diode can, for improved thermal contact. The fit around the diode can is a bit loose in this case, it could be just a little tighter, not quite press-fit tight:

As I mentioned, the flat part of this heatsink is a perfect press fit for a Laser 303 host. If I were using this in a 303 host I would just get rid of those outer threads. The heatsink would need to be a bit shorter overall, such that the face is about 2 to 3 mm beyond the lip of the host, and that it completely fills the heatsink socket. Making it out of copper would probably be a good idea too. I guess two different versions would be needed, 5.6mm and 3.8mm. Maybe more than two, in the case of "long" diodes like that new Opnext 170mW @ 638nm.
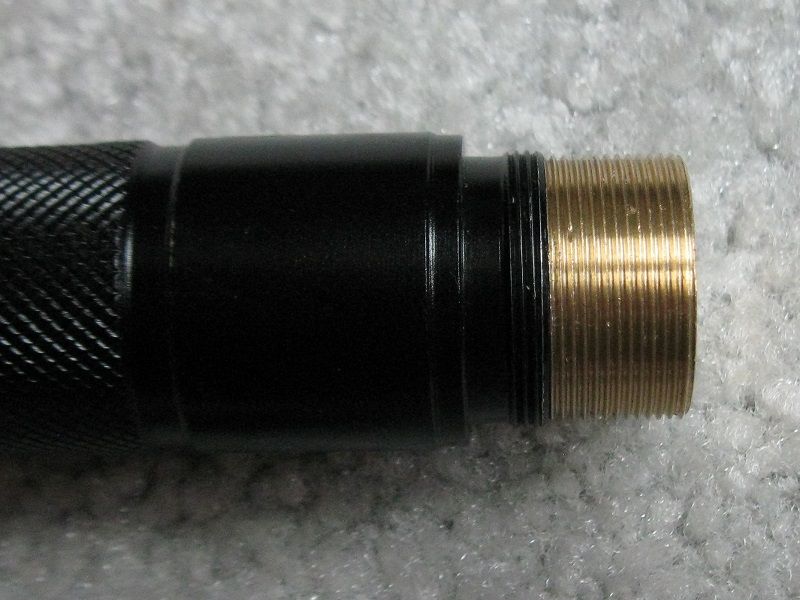
There it is, the flat part press-fit into the 303. The fit is tight, no wiggle at all. It's backwards in this case, just imagine those threads are smooth and that the diode is actually facing out, not in:

So why this type of heatsink? Three reasons:
1) The diode can be installed separately from the driver. The WORST thing about building a 303 is going to be getting the switch positioned correctly - this is a rather cramped host. At least, I think it is. With this heatsink, the driver and switch can be set up and positioned first, without the diode and heatsink in the way. That sounds a lot easier, and there's no risk of diode pin damage during the process.
2) No need to press a diode into place. The diode well can be a tight fit, and the retaining ring can do whatever pressing is needed. Maybe a pressed diode would have better heat transfer, but I don't think it's necessary given the way in which a 303 is generally used. The stock heatsinking is actually good enough for most things, and this setup is far better than that.
3) As mentioned, far, far better heatsinking than the stock 303 can offer. With some thermal paste, efficient heat transfer to the host is assured. You generally don't run a 303 continuously, it's the type of laser that you flash around at night at outdoor music festivals and whatnot, so a C6-sized heatsink isn't really needed. With this setup, duty cycle should not be a problem - even with stock heatsinking, none of my 303/LZCS units ever died from heat, and I do run a harder duty cycle than recommended.
There you have it, I think it's an interesting heatsink design overall and I think it will work well in a custom, good-quality Laser 303 build. I will have to get some made, I suppose. At this point, I think I just need to figure out a good way of mounting the driver and switch in place (some sort of bracket would do), and that should be about it.
The build would be, more or less:
1) Install diode in heatsink and set aside.
2) Assemble driver and switch outside of host, set the LD current, then install / finagle it into place so that the switch works, the driver's LD terminals are accessible, and make sure everything will stay put.
3) Short driver LD terminals, solder diode leads to driver.
4) Press-fit heatsink into place and secure it with some thermal paste and maybe a VERY small amount of thermal epoxy. Heatsink needs to be removeable for repairs, after all....
5) Throw a battery in there, test laser to make sure it works. If so, dial in the focus and re-assemble remaining host parts.
6) It should be a working Laser 303 at this point. Ideally, it would look, feel, and handle exactly like a stock Ebay 303. Except, with consistently good performance, and none of the quality issues that plague stock units.
Can any machinist types estimate how much it would cost to make a custom heatsink out of copper, using the general the Skylaser design, modified as described earlier? I'm very, very interested in finding out.
I think this will work. With any luck I should be able to put one of these together sooner rather than later, I'll be sure to make a thread for it if and when I pull it off. Thanks for reading, if you have any ideas or other suggestions, please let me know
The most interesting thing I found was the heatsink and the way the heatsink is designed. I'm still interested in building custom, high-quality Laser 301/303's, and I think this type of heatsink would really simplify a 303 build. The flat part of the heatsink is already a perfect press-fit for the 303 host, just add a tiny (TINY!) dab of thermal epoxy to hold it in place. MUCH better than the stock 303 heatsinking!
Maybe this general design would simplify other builds too.
Here is the heatsink, have a look - basically a big 5.6mm diode module, solid brass:

The diode leads exit out the back of the heatsink and can be positioned as needed.
The diode retaining ring's thread is smaller than M9 but the thread pitch is the same. I would guess it's an M8x0.5 thread, or maybe an M7x0.5. It's the same size thread as the lens holder ring on the Techhood/Fasttech 532nm DPSS modules, if that helps.
As a bonus, the retaining ring prevents the lens from contacting the diode under any circumstances, so no need to worry about crushing the diode window due to improper lens adjustment.
The inside of the retaining ring is sized and shaped to closely fit the laser diode can, for improved thermal contact. The fit around the diode can is a bit loose in this case, it could be just a little tighter, not quite press-fit tight:

As I mentioned, the flat part of this heatsink is a perfect press fit for a Laser 303 host. If I were using this in a 303 host I would just get rid of those outer threads. The heatsink would need to be a bit shorter overall, such that the face is about 2 to 3 mm beyond the lip of the host, and that it completely fills the heatsink socket. Making it out of copper would probably be a good idea too. I guess two different versions would be needed, 5.6mm and 3.8mm. Maybe more than two, in the case of "long" diodes like that new Opnext 170mW @ 638nm.
There it is, the flat part press-fit into the 303. The fit is tight, no wiggle at all. It's backwards in this case, just imagine those threads are smooth and that the diode is actually facing out, not in:

So why this type of heatsink? Three reasons:
1) The diode can be installed separately from the driver. The WORST thing about building a 303 is going to be getting the switch positioned correctly - this is a rather cramped host. At least, I think it is. With this heatsink, the driver and switch can be set up and positioned first, without the diode and heatsink in the way. That sounds a lot easier, and there's no risk of diode pin damage during the process.
2) No need to press a diode into place. The diode well can be a tight fit, and the retaining ring can do whatever pressing is needed. Maybe a pressed diode would have better heat transfer, but I don't think it's necessary given the way in which a 303 is generally used. The stock heatsinking is actually good enough for most things, and this setup is far better than that.
3) As mentioned, far, far better heatsinking than the stock 303 can offer. With some thermal paste, efficient heat transfer to the host is assured. You generally don't run a 303 continuously, it's the type of laser that you flash around at night at outdoor music festivals and whatnot, so a C6-sized heatsink isn't really needed. With this setup, duty cycle should not be a problem - even with stock heatsinking, none of my 303/LZCS units ever died from heat, and I do run a harder duty cycle than recommended.
There you have it, I think it's an interesting heatsink design overall and I think it will work well in a custom, good-quality Laser 303 build. I will have to get some made, I suppose. At this point, I think I just need to figure out a good way of mounting the driver and switch in place (some sort of bracket would do), and that should be about it.
The build would be, more or less:
1) Install diode in heatsink and set aside.
2) Assemble driver and switch outside of host, set the LD current, then install / finagle it into place so that the switch works, the driver's LD terminals are accessible, and make sure everything will stay put.
3) Short driver LD terminals, solder diode leads to driver.
4) Press-fit heatsink into place and secure it with some thermal paste and maybe a VERY small amount of thermal epoxy. Heatsink needs to be removeable for repairs, after all....
5) Throw a battery in there, test laser to make sure it works. If so, dial in the focus and re-assemble remaining host parts.
6) It should be a working Laser 303 at this point. Ideally, it would look, feel, and handle exactly like a stock Ebay 303. Except, with consistently good performance, and none of the quality issues that plague stock units.
Can any machinist types estimate how much it would cost to make a custom heatsink out of copper, using the general the Skylaser design, modified as described earlier? I'm very, very interested in finding out.
I think this will work. With any luck I should be able to put one of these together sooner rather than later, I'll be sure to make a thread for it if and when I pull it off. Thanks for reading, if you have any ideas or other suggestions, please let me know
Last edited:


