

I though you folks might like this, so I figured I'd document the process.
My Multiline was running very hot and I noticed a lot of dust and blockage on the cooling fins, so I decided to strip the head and clean it.
The only part I didn't document was the front plate and circuit board. Those are simple enough. You just need to remove the ground wire from the front cap, the connector from the circuit board, two screws from the photo-detector and two screws form the circuit board... and then the circuit board assembly will pull straight out.
Next, you will see the brass (copper?) plate that the circuit board mounts to - it is attached by three screws around the outside of the head. Remove those. It is a snug fit and you will need to wiggle it a bit as you work it our the front.
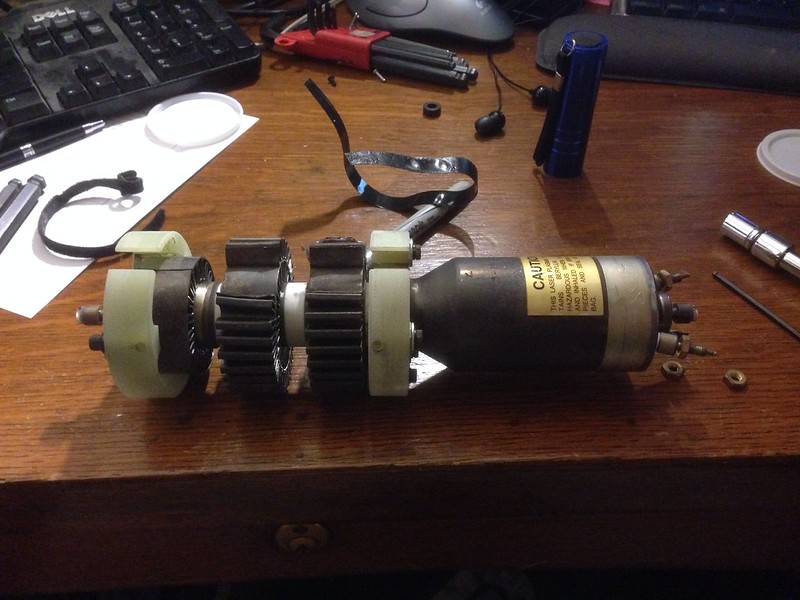
Now - you are left with this:
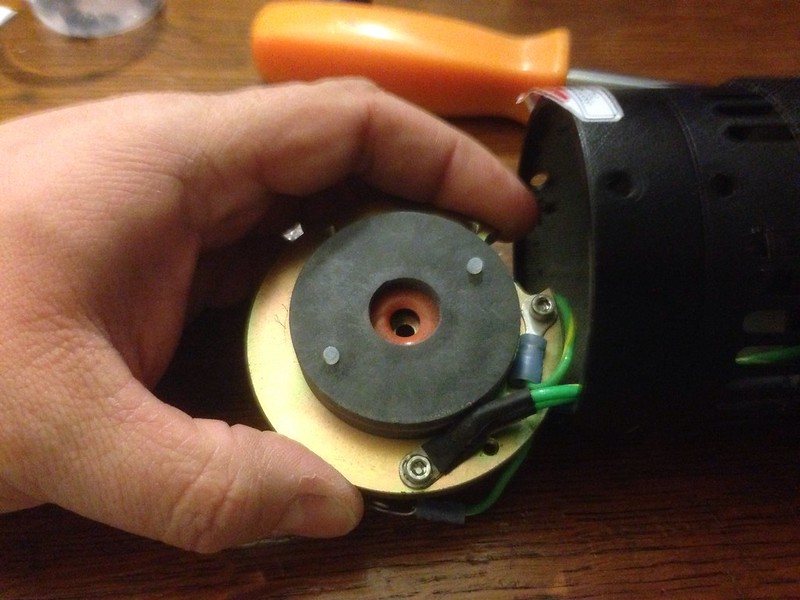
Jdsu argon cleaning by Christopher Purdy, on Flickr
The upper wire is a ground wire that runs from the copper plate to the screw you just disconnected on the front plate. Leave it in place.
The lower two wires are ground wires that come from the rear of the assembly. remove the screw they are attached two and make note of where they attach so you can re-attach them later.
Now - looking into the tube you will see this:
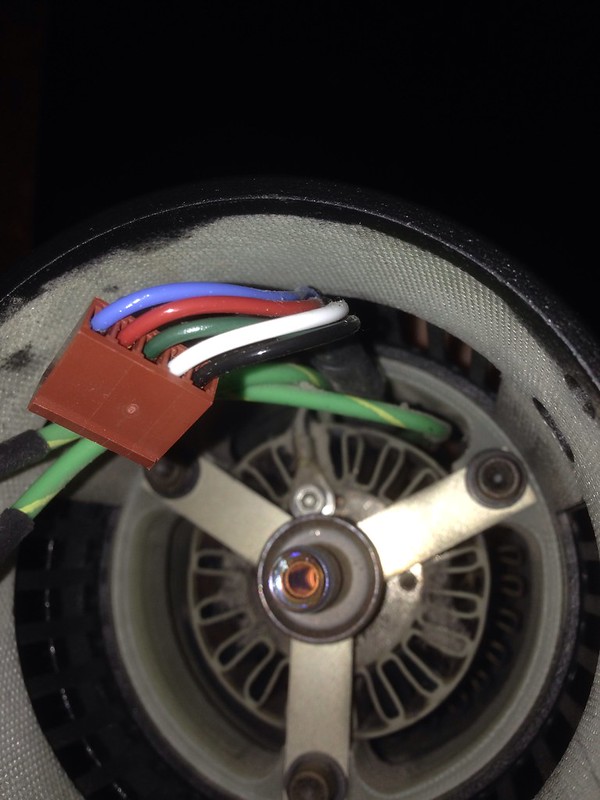
Jdsu argon cleaning by Christopher Purdy, on Flickr
Note the wire bundle at the top - it runs through a channel in the fins and standoffs - keep this in mind as you continue, as you will need to make sure it doesn't get snagged on anything, and keep it in the channel as you work.
Toward the top middle of the picture you will see another ground wire that attaches to the cooling fins - same as before - remove the screw and make note of the wire and how it attaches.
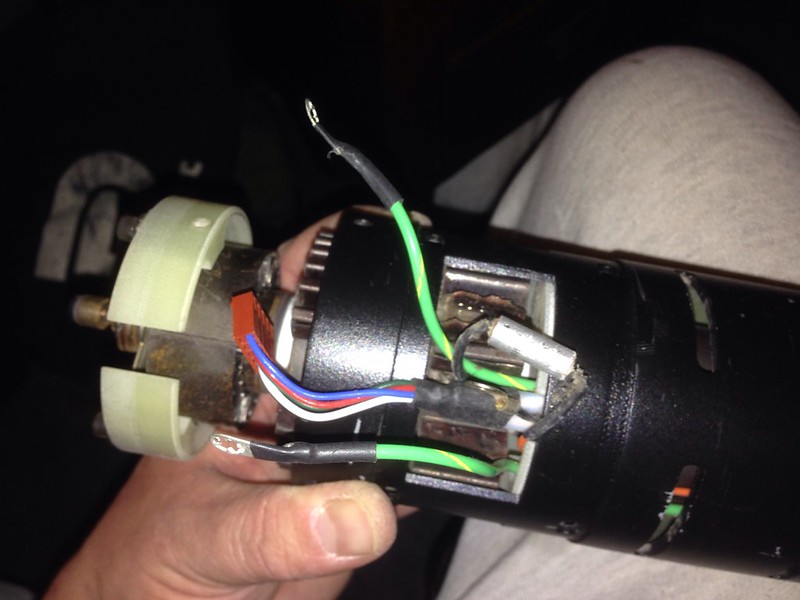
Next, remove the two high voltage lines at the rear of the head (sorry, I don't have a pic of this). Each high voltage connector has two wires of the same color going to it. Mark the side of the tube and one connector to remind yourself which one goes in which location.
Now - remove the remaining six screws on the outside of the head. These screws hold the tube in place in the head. The front of the tube has a black shield wrapped around it with cooling slots. The screws that hold this on are the three you removed in order to remove the copper plate and an additional three behind those which attach the tube standoffs to the shell.
Also - there is a shiny plastic cover about 1/2-2/3 the way down the head. This is just a cover for part of the tube and its access holes... you will need access to these holes in order to work the tube out of the shell. Remove this plastic cover and set it aside - it is backed with adhesive and you can re-apply it later in the same position. It aids in directing airflow over the tube bu closing the access holes.
Once the remaining screws and the plastic cover are removed, you can start working the tube forward. I found that pressing on the rear of the tube, gently, at the widest point got it moving.
All the while you are working it out the front, keep track of the wire bundle and make sure it is still in its channel as the tube moves forward.
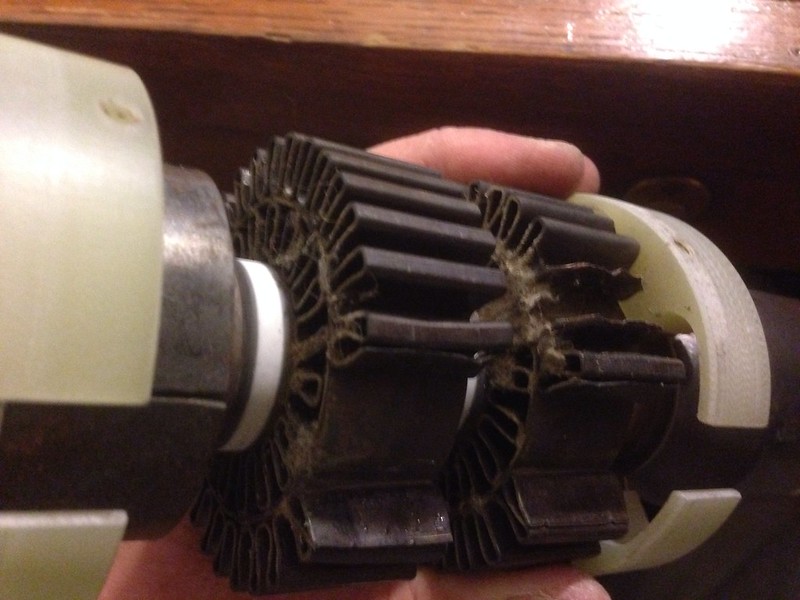
Once you get to roughly the image below:
Jdsu argon cleaning by Christopher Purdy, on Flickr
You will notice there are two small wires that go to the thermal over limit detector. That is the silver can in the image. It is in between two cooling fins and the fins are bent around it so that it is snug.
To remove it, I just used needle nose pliers and un-bent the cooling fins a bit and it popped right out.
Pull the thermal detector aside along with the wire bundle and pull them out the access hole in the side as shown in the pic above.
Now - double check that all the wires are free and not binding as you slide the tube assembly out - check the rear of the head periodically to make sure nothing is pulling or binding.
The tube will be difficult to remove. I wound up pulling on the cooling fins form the front of the tube once I had wiggles the tube out far enough.
The tube should come free after a few minutes of work. Its not as difficult as it sounds... and now you have full access to your cooling fins for cleaning:
Jdsu argon cleaning by Christopher Purdy, on Flickr
You can see how nasty the cooling fins are and how much air is restricted... I used an old toothbrush to get all of the dust and dirt out of them..
Jdsu argon cleaning by Christopher Purdy, on Flickr
Assembly is just the reverse of this... Just go slow and take your time. Make sure you aren't kinking any wires.
Also - check all your wires while the tube is out and see if you have any frays or bare spots... I had a couple of areas that I taped up just to be safe.
My tube is back together and running much cooler and I'm getting a bit more output from it...
I'll eventually post another thread about tweaking the tube for max output... If you leave the front metal shield off you will have access to the output tube and can apply gentle pressure to it to adjust it. By wrapping a velcro wire tie around this and keeping some pressure on it in a specific direction, I was able to get my sixth line to pop out.
The whole process was very educational and I'm quite confident I can manage just about any repair on this head now.
My Multiline was running very hot and I noticed a lot of dust and blockage on the cooling fins, so I decided to strip the head and clean it.
The only part I didn't document was the front plate and circuit board. Those are simple enough. You just need to remove the ground wire from the front cap, the connector from the circuit board, two screws from the photo-detector and two screws form the circuit board... and then the circuit board assembly will pull straight out.
Next, you will see the brass (copper?) plate that the circuit board mounts to - it is attached by three screws around the outside of the head. Remove those. It is a snug fit and you will need to wiggle it a bit as you work it our the front.
Now - you are left with this:
Jdsu argon cleaning by Christopher Purdy, on Flickr
The upper wire is a ground wire that runs from the copper plate to the screw you just disconnected on the front plate. Leave it in place.
The lower two wires are ground wires that come from the rear of the assembly. remove the screw they are attached two and make note of where they attach so you can re-attach them later.
Now - looking into the tube you will see this:
Jdsu argon cleaning by Christopher Purdy, on Flickr
Note the wire bundle at the top - it runs through a channel in the fins and standoffs - keep this in mind as you continue, as you will need to make sure it doesn't get snagged on anything, and keep it in the channel as you work.
Toward the top middle of the picture you will see another ground wire that attaches to the cooling fins - same as before - remove the screw and make note of the wire and how it attaches.
Next, remove the two high voltage lines at the rear of the head (sorry, I don't have a pic of this). Each high voltage connector has two wires of the same color going to it. Mark the side of the tube and one connector to remind yourself which one goes in which location.
Now - remove the remaining six screws on the outside of the head. These screws hold the tube in place in the head. The front of the tube has a black shield wrapped around it with cooling slots. The screws that hold this on are the three you removed in order to remove the copper plate and an additional three behind those which attach the tube standoffs to the shell.
Also - there is a shiny plastic cover about 1/2-2/3 the way down the head. This is just a cover for part of the tube and its access holes... you will need access to these holes in order to work the tube out of the shell. Remove this plastic cover and set it aside - it is backed with adhesive and you can re-apply it later in the same position. It aids in directing airflow over the tube bu closing the access holes.
Once the remaining screws and the plastic cover are removed, you can start working the tube forward. I found that pressing on the rear of the tube, gently, at the widest point got it moving.
All the while you are working it out the front, keep track of the wire bundle and make sure it is still in its channel as the tube moves forward.
Once you get to roughly the image below:
Jdsu argon cleaning by Christopher Purdy, on Flickr
You will notice there are two small wires that go to the thermal over limit detector. That is the silver can in the image. It is in between two cooling fins and the fins are bent around it so that it is snug.
To remove it, I just used needle nose pliers and un-bent the cooling fins a bit and it popped right out.
Pull the thermal detector aside along with the wire bundle and pull them out the access hole in the side as shown in the pic above.
Now - double check that all the wires are free and not binding as you slide the tube assembly out - check the rear of the head periodically to make sure nothing is pulling or binding.
The tube will be difficult to remove. I wound up pulling on the cooling fins form the front of the tube once I had wiggles the tube out far enough.
The tube should come free after a few minutes of work. Its not as difficult as it sounds... and now you have full access to your cooling fins for cleaning:
Jdsu argon cleaning by Christopher Purdy, on Flickr
You can see how nasty the cooling fins are and how much air is restricted... I used an old toothbrush to get all of the dust and dirt out of them..
Jdsu argon cleaning by Christopher Purdy, on Flickr
Assembly is just the reverse of this... Just go slow and take your time. Make sure you aren't kinking any wires.
Also - check all your wires while the tube is out and see if you have any frays or bare spots... I had a couple of areas that I taped up just to be safe.
My tube is back together and running much cooler and I'm getting a bit more output from it...
I'll eventually post another thread about tweaking the tube for max output... If you leave the front metal shield off you will have access to the output tube and can apply gentle pressure to it to adjust it. By wrapping a velcro wire tie around this and keeping some pressure on it in a specific direction, I was able to get my sixth line to pop out.
The whole process was very educational and I'm quite confident I can manage just about any repair on this head now.


 )
)