Welcome to Laser Pointer Forums - discuss green laser pointers, blue laser pointers, and all types of lasers

LPF Donation via Stripe | LPF Donation - Other Methods

Links below open in new window

ArcticMyst Security by Avery

PT-121 Testing

Things

0
Joined
May 1, 2007
Messages
7,517
Points
0
Thanks Charles :)

Current control on these things seem more handy than voltage. I haven't actually powered mine up yet, but from what I read in the datasheet, I thought the track pin was only active during power up/down, kind of cool that it stays active the whole time.
 
Last edited:


Joined
Feb 2, 2012
Messages
577
Points
43
Here is a real Quick Circuit. I have to leave for work 5 Mins ago.

The Set Volts on the Regulator is set to Max. Then the Current Regulator controls it from the Tracking Pin.


Tracking.jpg


I didn't put it on the Drawing but the LM336 is the 5 Volt one.


Charles
 
Last edited:
Joined
Feb 1, 2008
Messages
2,894
Points
0
Interesting, I thought the track pin only controlled the ramp up/down and was useless while it was running. I have one of these little modules, I'd be interested in a schematic on how you did the current control with it.

You can sample them from TI also, but you need to select the "WAH" model. The WAD is not sampleable, but it's practically the same thing. You can only sample 1 now.

Actually, you can sample one of each 3 different sub models available for sampling. I just did it.

Thanks to MOSC007, I've finally got a way to drive very large laser diodes!
 
Joined
Jan 14, 2012
Messages
423
Points
0
For some reason, when I try to order samples from Ti for this particular item, it automatically puts my cart @ 0 quantity of each, and I cannot modify to add more.

Anyone else having this problem ?
 
Joined
Feb 2, 2012
Messages
577
Points
43
Nice build.

Has anyone done a blue yet.

I have a Blue PT-121 but havn't tried it yet.

I have designed a new PCB which will hold the Current Regulator and Voltage Regulator etc all on the one PCB. I should get a chance to make it up tonight after work. Will post a shot and the Artwork if anyone needs to make one.


Charles
 
Last edited:
Joined
Feb 2, 2012
Messages
577
Points
43
Here is the Full Circuit.

Circuit.jpg


You will need to Calibrate the 1mV Per Amp Signal to the Ammeter with the 25 Turn Pot. The Shunt gives 2.5mV's Per Amp. The Shunts are 0.005 Ohm 4 Watt.
The 3 Pots are 25 Turn Minature PCB mounted Pots. Other resistors are all 0.25 Watt. The 1 uF Capacitor around the Error Amp is NON POLARISED. Don't use a
Polarised Elctrolytic. Use a NP Electrolytic or Ceramic Etc.

Just a quick Warning. NEVER use the Inhibit pin on the Regulator Module when it's in Constant Current mode. This will cause the output from the Current Regulator to go to
MAXIMUM. When you release the Inhibit Pin you will have MAX Output Voltage for a very short time before the Current Regulator drops it. This May damage your LED or laser
Diode etc.


Here is the PCB. Probably not to scale. If you want a Full Scale one PM me and I will send it. This is looking from the Component side.

PCB.jpg


Component Layout.

Layout.jpg


NOTE. The Resistor on the UVLO Program pin is missing on the Component layout. But you should be able to tell were it goes.
The Extra Terminal Pads on the +12v and 0v Rails are for Fan's and the Ammeter supplies.


I havnt finished assembling the New PCB with the Current Regulator on the same board yet. I have made the PCB but need some components. I will finish it tomorrow.

I hope others find this a good way to convert these Modules into a Constant Current Module

I Ordered a Sample Yesterday. It got shipped Today. Thanks for the Tip. I have Ordered Heaps of samples from Microchip before. They are very cheap PIC's. I wasn't
expecting these pricey Modules could also be obtained by Sample. Thanks.


Charles
 
Last edited:
D

Deleted member 16589

Guest
I have a Blue PT-121 but havn't tried it yet.

I have designed a new PCB which will hold the Current Regulator and Voltage Regulator etc all on the one PCB. I should get a chance to make it up tonight after work. Will post a shot and the Artwork if anyone needs to make one.


Charles

yea i cant wait to see the blue. I want to make a blue MEGA mag-light with one :san:

Also if you don't mind me asking what software did you use for this
http://users.tpg.com.au/cyendle//Layout.jpg
 
Last edited by a moderator:
Joined
Feb 2, 2012
Messages
577
Points
43
I will have to give it a go. I should have a second Regulator Module soon. Nice to get one Free :)

I will make another complete setup with the Blue one. I reckon it will look awsome. Not many Lumens compared to Green. But Blue is Nice.


I used ExpressPCB and ExpressSCH for the PCB Drawings.


Charles
 
Last edited:
Joined
Feb 2, 2012
Messages
577
Points
43
Here is a Photo of the New PCB before installing it. You can see the Component Layout.

Assembled.JPG


That Top Left Capacitor is the Integrator for the Error Amp. I have used a NP Electro.


Charles
 
Last edited:
Joined
Feb 2, 2012
Messages
577
Points
43
Just installed and tested the New PCB. It's working just fine. I have set the Max Output Volts to Max and the Current Regulator is controlling it nicely
from the Tracking Pin.

Note, I have changed the Value of 2 resistors on the Full Circuit I posted. I had the wrong values on them.


Charles
 
Last edited:

rhd

0
Joined
Dec 7, 2010
Messages
8,475
Points
0
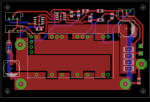
I played around with your circuit a bit in Eagle, to try and create something capable of driving those 40W laser diode bars. I swapped most of the parts for surface mount, and added an output filter. I also used 4x 0.01 ohm 3W surface mount resistors instead of 2x 0.005 ohm.

I'd like to implement a MOSFET or some sort of enabling circuit that would allow this to turn on/off without having to use a giant beefy switch to handle that input current/voltage.

Here's what I came up with. It's roughly 9 x 6 cm.
attachment.php
 

Attachments

  • Untitled.png
    Untitled.png
    24.6 KB · Views: 551
Last edited:
Joined
Feb 2, 2012
Messages
577
Points
43
That certainly looks nice and compact. I have never been able to use much in the way of surface mount stuff. I am making them at home and surface mount requires expensive equipment to solder. I have never done a double sided PCB at home either.

One problem with using surface mount resistors for the current shunt is the temperature coefficiant. Those surface mount ones are going to get very hot. The resistors i used are 20 PPM which means the resistance doesnt change much as it heats up. On my linear LM317 regulators for my lasers I use ceramic resistors as they are pretty temperature stable. Its not unusual for standard resistors to change by 10% as they get hot. You need to check the data sheet on high power surface mount resistors. Even the 1 watt ones i looked into are only rated at 1 watt when their is a copper track under them to dissapate the heat. Even mount them with heat compound to the track. The track is used as the heat sink.

You might also want to check the data sheet on surface mount low ESR capacitors. They are usualy solid tantalum. The data sheet on the module doesnt recommend tantalum unless its run below zero dergrees. Good low ESR caps are usualy large for their size. The ones i used are rated at 3 amps ripple current. The data sheet is very specific at what caps to use to meet its output ripple and stability specs.

Sure looks nice. You also may want to lower the 220k resistor feeding the error amp. I have made the current regulator slow. Its around a 200ms time constant. The tracking pin on the module is rated at around 1-2ms from the data sheet. I guess unless you need to modulate it then the time constant i used is fine. It also gives it a small soft start.

It might also be a good idea to bond a small heatsink to the top of the 3 inductors on the module. Even at 30 amps they get very hot.

If you wanted to add an enable you could use a mosfet to ground the current referance to the error amp. It wont hurt to short out the LM336 because its fed via the 6.8k resistor.


Charles
 
Last edited:

rhd

0
Joined
Dec 7, 2010
Messages
8,475
Points
0
Oh reflow is really easy. If you use lead free components, you can just use your oven. Even if not, a $20 Walmart toaster oven is fine.

Digi-Key - CSSH2728FT10L0CT-ND (Manufacturer - CSSH2728FT10L0)
What do you think about using four of those surface mount resistors? They're 25 ppm.

If you were going to change the 220k resistor, what would you change it to?
 
Joined
Feb 2, 2012
Messages
577
Points
43
I might have to look into reflow. The only surface mount i have done is to manualy solder a 18 pin ic to a board using a magnifier and very small tip iron.

Those 25 ppm resistors sound fine. I would only be concerned about how hot they are goint to get. You need 40 amps which is 4 watts. Thats 1 watt per resistor. Well within specs. But its a lot of heat for a small component. You dont want to melt the solder on it.

The 220k resistor could probably be dropped to 47k easily. But i would stick a CRO on the output of the error amp and make sure its still stable. Instability would put current spikes thru the diode.


Charles
 
Last edited:


Top