Welcome to Laser Pointer Forums - discuss green laser pointers, blue laser pointers, and all types of lasers

LPF Donation via Stripe | LPF Donation - Other Methods

Links below open in new window

ArcticMyst Security by Avery

My attempt at a DVD burner Red

Joined
Sep 18, 2007
Messages
121
Points
0
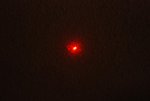
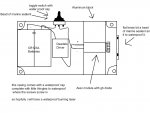
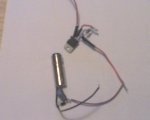
Here is my cobbled together attempt at a DIY DVD burner red. I think I half destroyed this thing getting it from the burner though. I dented the front of the diode but it still works. I had a 100ohm pot inthis circuit but the diode would barely lase so I took it out andjust have the 2 10 ohm resisters there in parallel. The circuit draws 175ma from 4 AA alkaline cells and I have no idea what the mW would be since I have no meter. The two stumbling blocks I hit were getting the diode out of the burner and the LM317T I bought from RatShack had a slightly different pinout that the one in circuit that was posted on the forum. I have no idea how strong it is but it produces a nice red beam a night and was fun to hack together. The next one will be a GB diode and a neater circuit. The DVD burner this came out of was a Lite-On 16x DL and the diode was a closed can.

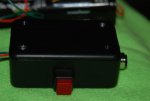
I have a project box from RatShack that I will assemble this into and most likley power it from a 7.4 volt 400 mah lithium polymer battery if it will fit.
 

Attachments

  • DIYredlaser.jpg
    DIYredlaser.jpg
    98.8 KB · Views: 349


Joined
Sep 18, 2007
Messages
121
Points
0
Cameraphones take nasty looking pics don't they. Sorry about that. Better pics next time.
 
Joined
Jul 24, 2007
Messages
2,749
Points
0
Nice one! I see in the haze a capacitor and a diode as well as a regulator so a proper circuit that should keep the LD happy. Have you lit,burst or smoked anything with it yet?

Regards rog8811
 
Joined
Sep 18, 2007
Messages
121
Points
0
Yeah, I think I got most of the right stuff in there. Have not tried burning or popping yet. I personally don't think it will have enough power to do that though. I'm just happy it actualy works! I dented the diode can getting it out of the burner, then proceeded to break off the ground pin while removing the ribbon cable, then got it very hot trying to stupidly solder a ground wire on where the pin was. I ended up soldering the ground wire to the back half of the Aixiz module so as not to subject the diode to that much heat again. It took a while to get the focus in the right area as well. I enjoyed the fruits of my labor sitting outside last night shinning it into the sky and enjoying the pretty red beam. This is the most powerful red laser I have ever seen in person to date so I'm pretty happy. If I had to take a wild guess as to the power I would say maybe 30mW.

I ordered $35 worth of components as well as two new GB diodes from SenKat for my next try.
 
Joined
Jul 24, 2007
Messages
2,749
Points
0
It is a very satisfying feeling when a home brewed one lights up....and stays lit :)
You will be very happy with SenKats LD's

Regards rog8811
 
Joined
Jan 7, 2007
Messages
6,309
Points
83
You've taken the first big step. Hold your breath and power it up :D

Congrats -- There's no stopping you now !

Mike
 

Gazoo

0
Joined
Jun 9, 2007
Messages
3,206
Points
38
The pins of all of the LM317's are the same. I can tell from looking at the way you have yours wired it is the same as Daedal's circuit. The problem with the diagram Deadal posted is he numbered it differently from the pins on the LM317.

Anyway congrats on your first laser. Running at 175ma's should yield power in the 80mw range...
 

mw1111

0
Joined
Oct 8, 2007
Messages
137
Points
0
well at that mW im pretty sure burning things is a total possibility, so no reason to hesitate! give us a video lol
 
Joined
Sep 18, 2007
Messages
121
Points
0
Here are some more pics... It will pop a black baloon from across the room almost instantly! I must say, I'm quite pleased with this and can't wait for my GB diodes to arrive! It was a lot of fun and I'm really surprised that it even works with all of the mistakes I made! Every once in a while the focuse gets screwey and I have to give it a sharp rap to get it to straighten out. I'm sure that's from crushing the front of the diode trying to get it out of the heatsink it was glued into! My wife and I have really enjoyed sitting out on the back deck shining our lasers into the sky. Last night I lit about 5 incense sticks on the rail of the deck and that was nice for the beams. The red really shows up better than I thought it would which pleases me more that the burning power.

This picture is of the project box I stuffed everything into.
 

Attachments

  • DSC_2040.JPG
    DSC_2040.JPG
    32.5 KB · Views: 242
Joined
Sep 18, 2007
Messages
121
Points
0
This is a picture of the dot projected onto the white ceiling. I'm really fascinated with how bright this is as I've only owned >5mW reds before!
 

Attachments

  • DSC_2038.JPG
    DSC_2038.JPG
    24.2 KB · Views: 202
Joined
Sep 18, 2007
Messages
121
Points
0
Oh yeah, I would like to say that this has been so much fun doing and none of this would have been possible with out all of the great folks on this forum contributing advice and circuit designs, etc .... You guys are truley amazing folks!
 
Joined
Jul 7, 2007
Messages
492
Points
0
:eek: that is awesome where did you get that case?

very nice job by the way ;)
Hopfuly mine turns out as good as yours
 
Joined
Sep 18, 2007
Messages
121
Points
0
It's just a project box from Radio Shack. I took my dremel too (must have tool for any tinkerer) and used the cone shaped grinding attachment to make holes for the pushbutton(also Radio Shack) and front of the Aixiz module. I used an 8 AA battery holder (They were sold out of the 4 AA holder) and soldered wires to the contacts so only 4 AAs would need to be used. I used hot glue to keep the aixiz module from moving around inside and to insulate bare connections inside the box. Not my best work but I was anxious to get something going. Good luck on yours!
 

Attachments

  • avatar_shades_small2.jpg
    avatar_shades_small2.jpg
    26.7 KB · Views: 367
Joined
Jul 7, 2007
Messages
492
Points
0
all i nees now are the parts to come in i am planning on makking mine waterproof. i bought one of these size g
http://www.hammondmfg.com/dwgw.htm
i alredy tested the waterproofing of the case and it is sealed tight.

heres a drawing of what i hope it to look like
 

Attachments

  • laser_plans.jpg
    laser_plans.jpg
    106.8 KB · Views: 2,677

Things

0
Joined
May 1, 2007
Messages
7,517
Points
0
glad you got it working, and the waterproof one will be very interesting for sure! great work! ;)
 
Joined
Sep 18, 2007
Messages
121
Points
0
Hey, that looks cool! Very nice drawing! I saw those project boxes on www.allelectronics.com. That's where I get a ot of my components from. Can't wait to see how it turns out. I need to add an extra toggle switch to mine for saftey. When the batteries are in the holder it's to easy to accidently press the red button when picking it up or handling it then you get a nice big blast of red when your not expecting it!


Top