T
tommygreen23
Guest
IF YOU ATTEMPT THIS MOD, YOU WILL VOID YOUR WARRENTY. I DO NOT SUGGEST YOU ATTEMPT THIS MOD IF YOU HAVE NO EXPERIENCE WITH LASERS. IF YOU MESS IT UP, ITS YOUR FAULT AND 9 TIMES OUT OF 10 IT WILL BE BROKE FOR GOOD.
Ok, the new case looks cool, but it is really poorly designed. ill be walking you through the guide to widen the aparture, increase the conductivity between the module and the case, and modifying your pulsar to focus it on the fly.
TAKE THE BATTERIES OUT FIRST!
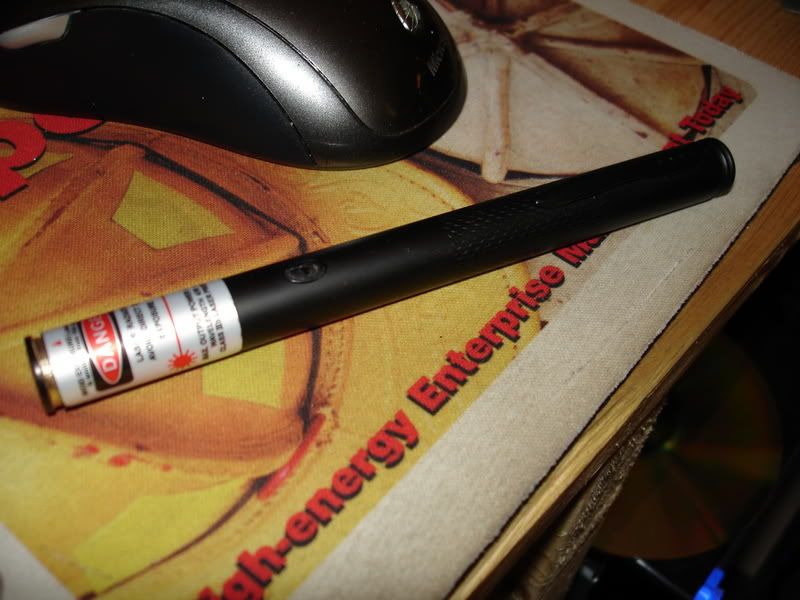
to begin, make sure you have the right pulsar, it should look like this.
the first thing you need to do is discharge all the static your body has built up, touch your full hand to a grounded piece of metal. i use my computer case.
now you need to open the aparture, the hardest part in my opinion. i took a razorblade, circled the whole thing untill i could fit an x-acto blade in the seam, then i circled it again untill i could fit a pocket kinfe blade in the wider seam. i circled the seam with the pocketknife untill it poped off. dont worry, it wont take too long, but you need to be paitent! the more time you take, the nicer it will look when finished.
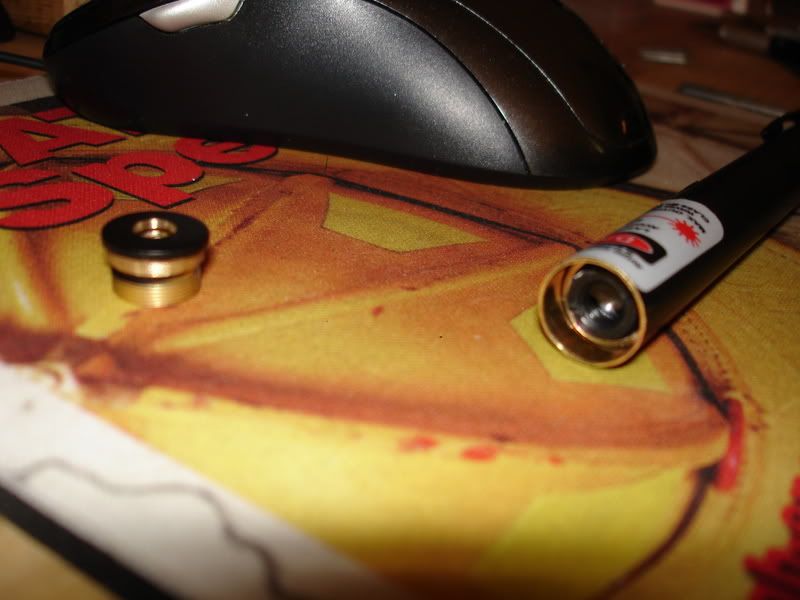
ok, you got the cap off, it will look a little diffrent than in this pic, more on that later.
now you have a choice, if you just want to widen the aparture, take it to a drill press and widen it to a little less than 1/4 of a inch. after that, you can just press it back in. and your done.
if you want to go further, you will need to get at least the first part of the module out. first, you will have to remove the button. dont worry, its a lot easier here than on a CNI
to do so, look at the button. you should notice that there are two parts, they are just glued together. insert a rasorblade between the two buttons, and pop it off. i suggest you stick it in a plastic bag, as it is tiny and gets lost easy! there are acually two identical buttons stacked on each other, it is only necessary to remove one, but takeing both off makes the job easier. to remove the second button, use the rasorblade again, but be careful to avoid scratching the paint!
OK, now you have the button off, you can pop the module out. to do so, get a pencil with a rubber eraser, and insert it, eraser first, into the back of the pulsar. push waht is left of the button in, and gently, GENTLY, push the module out. as always, go slow. take your time! depending on what you want to do, you can push it out untill the diode houseing is partially out, or you can push it all the way out.
if you want to clean the corrosion off of the positive terminal, oviously you will have to push it all the way out. DO NOT PULL ON THE CHROME PART YET! push untill you see the beginning of the white part, and use a sharpie to mark a straight line from the chrome part unto the white part. this is to make sure you put the right pins in the right place in case the diode houseing (chrome part) falls off. as soon as you can get a grip on the white part, you can gently grab it and slowly pull it out. after you have the module out, use some scotchbrite or somthing similar to clean the corrosion off of the terminal. then use compressed air to clean everything off, you dont want any eletrical shorts! if you pull the entire module out, you can increase the power even more by sanding the inside of the barell as well.
you may also wish to sand the black plastic driverboard holder. to do so, i suggest removeing it, which is a little hard. notice the seam on the bottom? pull that apart, and slowly walk it back and off. WATCH THE BUTTON! GO SLOW! after it is off, sand the bottom sides, make sure you dont break the flange for the switch. after you get it sanded down a little, open the seam back up, and slowly! (again) walk it back on. done!
the big brass disc on the end, thats the terminal, clean it off a little
now you can put the module back in, for now. just leave the entire chrome module and the mark you made on the white part visible. (for those of you who didnt clean the terminal, you should pick up here)
now, pull the houseing off of the white piece, if you feel any resistance, stop! you do not want to break those pins! now, pick a little part, and sand a patch off. be sure to cover the lens on the end, dont want any dust on it! after this, plug it back into the white part, use the mark you made. (you did make a mark, right?)
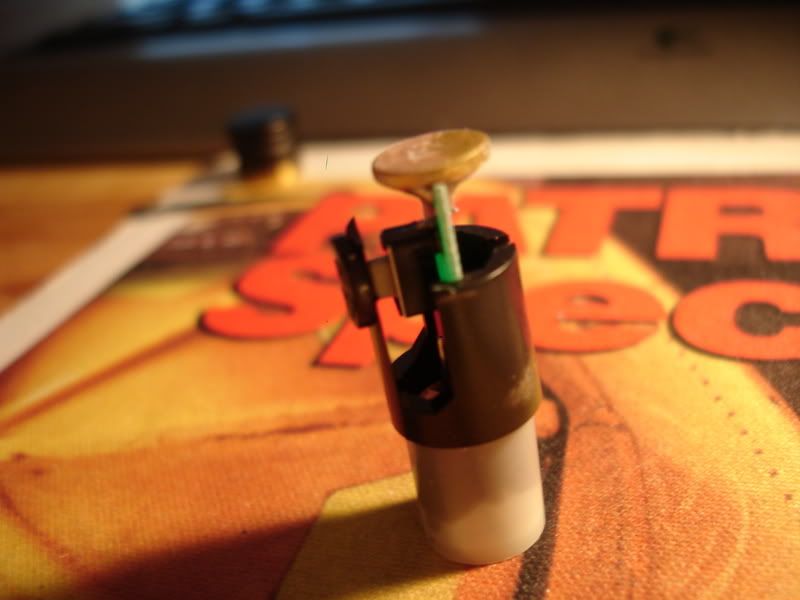
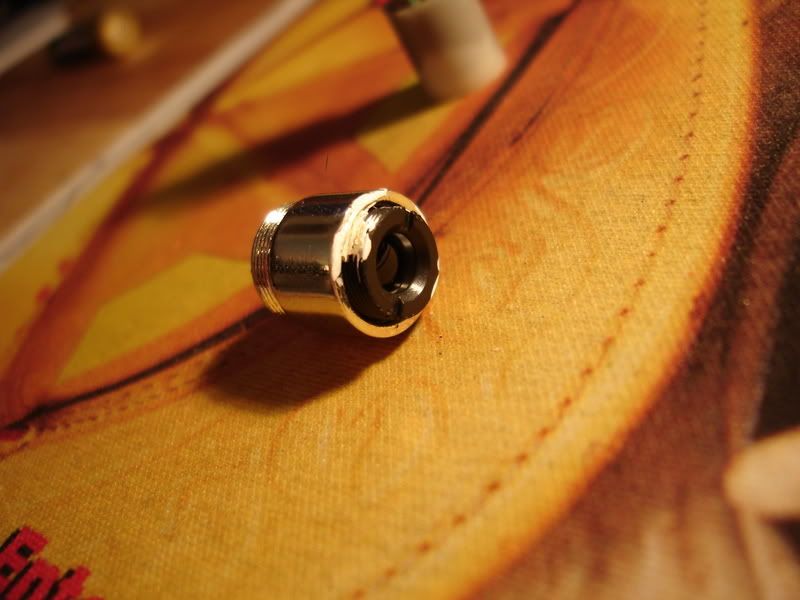
the diode houseing..
now for the foil, or copper or wahtever you have to increase conductivity. i found that it was easy to bend a little piece over the lip of the houseing to keep it form slideing out, somthing like this...
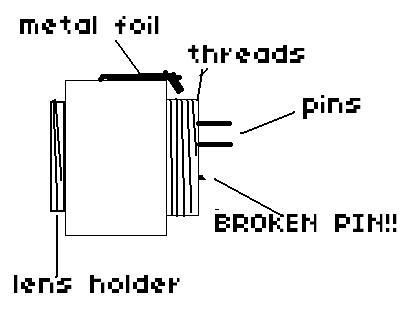
the broken pin is normal, it is the feedback pin, to control the diode. oviously wicked has confidace that this is not nesessary, since they just lob it off!
ok the foil should be in place, now jsut slide it all back in. the tricky part, you have to get the button lined back up with the hole. if you didnt pull it out all the way, it shouldnt be too hard, if you did it will be a little harder. trial and error is how i got this, there is really no other way, just dont twist on the chrome part, you will break the pins, and then you are in trouble.
if you want to make yours focusable, skip down a little...
everything should work form here, you should be able to put the batteries back in to test it. does it work? good! lets continue...
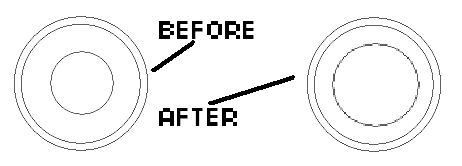
now to focus it! notice on the aparture the continuous notches? that is what holds it still. you need it to turn, so waht to do? grind them off! i used a dremel tool, but it could be done other ways i guess. when your done, it will look like this...
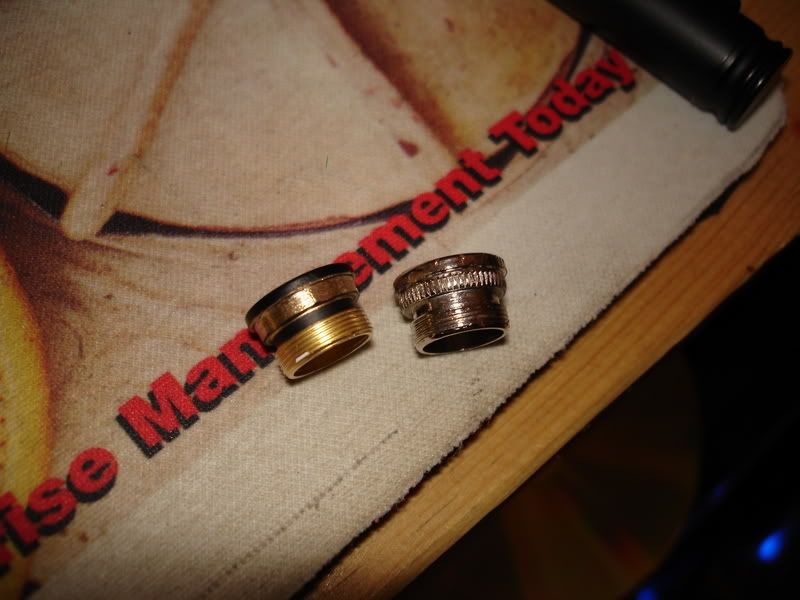
the one on the right is a leadlight aparture, this is what the pulsar's looks like ungrinded. the one on the left? the grinded down pulsar aparture, no more notches left, and it turns freely in the opening of the laser.
you also need to clean all of the white gunk off of the black lens holder. to do so, use a big flat screwdriver and turn it till it snaps, and slowly back it all the way out. then use a x-acto knife to clean it all out of the threads. be careful to not scratch the lens! when you are done, stick it back in, about as far as it started.. done!
now you have to glue the aparture to the lens holder, you will want to use a glue with no fumes, so it does not mess up the pulsar's lens. a good epoxy or somthing simalar will do nicely.
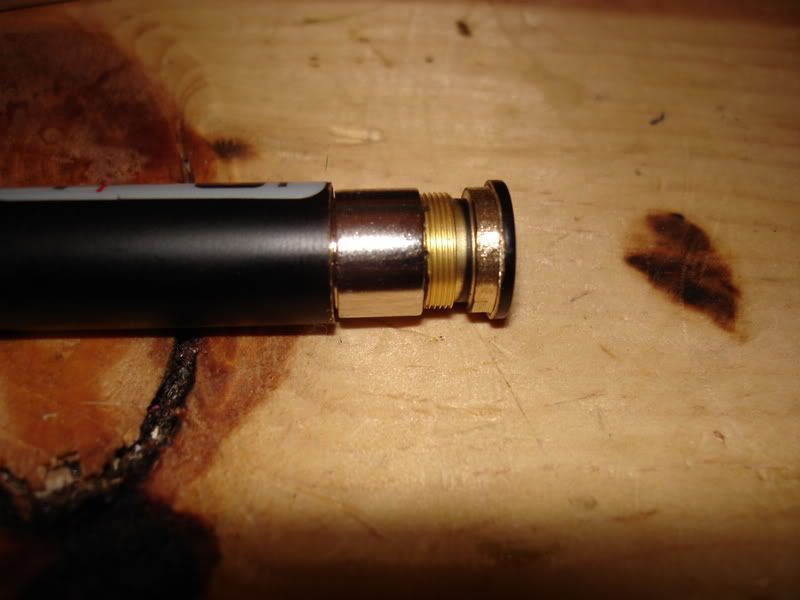
now screw the lens in to the best collmination setting. since the focal point is moved closer by moveing the lens away, it is never nessacary for it to be any closer than the "best" clomination setting. put a little bead of glue on two sides, and stick the aparture cap over it, and let it sit till it dries. you will have somthing looking like this...
when the glue is dried, push the whole assembly back in, foil and all. glue the button back down, pop in some batteries and enjoy! you can focus your pulsar by turning the aparture! unleash the power of the pulsar!
thanks to Chargerman, Gadgeteer, and all others who helped me
this can be done on the older pulsar, i have no experience with it, but the insides are the same. you should have similar results with it as well.
Ok, the new case looks cool, but it is really poorly designed. ill be walking you through the guide to widen the aparture, increase the conductivity between the module and the case, and modifying your pulsar to focus it on the fly.
TAKE THE BATTERIES OUT FIRST!
to begin, make sure you have the right pulsar, it should look like this.
the first thing you need to do is discharge all the static your body has built up, touch your full hand to a grounded piece of metal. i use my computer case.
now you need to open the aparture, the hardest part in my opinion. i took a razorblade, circled the whole thing untill i could fit an x-acto blade in the seam, then i circled it again untill i could fit a pocket kinfe blade in the wider seam. i circled the seam with the pocketknife untill it poped off. dont worry, it wont take too long, but you need to be paitent! the more time you take, the nicer it will look when finished.
ok, you got the cap off, it will look a little diffrent than in this pic, more on that later.
now you have a choice, if you just want to widen the aparture, take it to a drill press and widen it to a little less than 1/4 of a inch. after that, you can just press it back in. and your done.
if you want to go further, you will need to get at least the first part of the module out. first, you will have to remove the button. dont worry, its a lot easier here than on a CNI
to do so, look at the button. you should notice that there are two parts, they are just glued together. insert a rasorblade between the two buttons, and pop it off. i suggest you stick it in a plastic bag, as it is tiny and gets lost easy! there are acually two identical buttons stacked on each other, it is only necessary to remove one, but takeing both off makes the job easier. to remove the second button, use the rasorblade again, but be careful to avoid scratching the paint!
OK, now you have the button off, you can pop the module out. to do so, get a pencil with a rubber eraser, and insert it, eraser first, into the back of the pulsar. push waht is left of the button in, and gently, GENTLY, push the module out. as always, go slow. take your time! depending on what you want to do, you can push it out untill the diode houseing is partially out, or you can push it all the way out.
if you want to clean the corrosion off of the positive terminal, oviously you will have to push it all the way out. DO NOT PULL ON THE CHROME PART YET! push untill you see the beginning of the white part, and use a sharpie to mark a straight line from the chrome part unto the white part. this is to make sure you put the right pins in the right place in case the diode houseing (chrome part) falls off. as soon as you can get a grip on the white part, you can gently grab it and slowly pull it out. after you have the module out, use some scotchbrite or somthing similar to clean the corrosion off of the terminal. then use compressed air to clean everything off, you dont want any eletrical shorts! if you pull the entire module out, you can increase the power even more by sanding the inside of the barell as well.
you may also wish to sand the black plastic driverboard holder. to do so, i suggest removeing it, which is a little hard. notice the seam on the bottom? pull that apart, and slowly walk it back and off. WATCH THE BUTTON! GO SLOW! after it is off, sand the bottom sides, make sure you dont break the flange for the switch. after you get it sanded down a little, open the seam back up, and slowly! (again) walk it back on. done!
the big brass disc on the end, thats the terminal, clean it off a little
now you can put the module back in, for now. just leave the entire chrome module and the mark you made on the white part visible. (for those of you who didnt clean the terminal, you should pick up here)
now, pull the houseing off of the white piece, if you feel any resistance, stop! you do not want to break those pins! now, pick a little part, and sand a patch off. be sure to cover the lens on the end, dont want any dust on it! after this, plug it back into the white part, use the mark you made. (you did make a mark, right?)
the diode houseing..
now for the foil, or copper or wahtever you have to increase conductivity. i found that it was easy to bend a little piece over the lip of the houseing to keep it form slideing out, somthing like this...
the broken pin is normal, it is the feedback pin, to control the diode. oviously wicked has confidace that this is not nesessary, since they just lob it off!
ok the foil should be in place, now jsut slide it all back in. the tricky part, you have to get the button lined back up with the hole. if you didnt pull it out all the way, it shouldnt be too hard, if you did it will be a little harder. trial and error is how i got this, there is really no other way, just dont twist on the chrome part, you will break the pins, and then you are in trouble.
if you want to make yours focusable, skip down a little...
everything should work form here, you should be able to put the batteries back in to test it. does it work? good! lets continue...
now to focus it! notice on the aparture the continuous notches? that is what holds it still. you need it to turn, so waht to do? grind them off! i used a dremel tool, but it could be done other ways i guess. when your done, it will look like this...
the one on the right is a leadlight aparture, this is what the pulsar's looks like ungrinded. the one on the left? the grinded down pulsar aparture, no more notches left, and it turns freely in the opening of the laser.
you also need to clean all of the white gunk off of the black lens holder. to do so, use a big flat screwdriver and turn it till it snaps, and slowly back it all the way out. then use a x-acto knife to clean it all out of the threads. be careful to not scratch the lens! when you are done, stick it back in, about as far as it started.. done!
now you have to glue the aparture to the lens holder, you will want to use a glue with no fumes, so it does not mess up the pulsar's lens. a good epoxy or somthing simalar will do nicely.
now screw the lens in to the best collmination setting. since the focal point is moved closer by moveing the lens away, it is never nessacary for it to be any closer than the "best" clomination setting. put a little bead of glue on two sides, and stick the aparture cap over it, and let it sit till it dries. you will have somthing looking like this...
when the glue is dried, push the whole assembly back in, foil and all. glue the button back down, pop in some batteries and enjoy! you can focus your pulsar by turning the aparture! unleash the power of the pulsar!
thanks to Chargerman, Gadgeteer, and all others who helped me
this can be done on the older pulsar, i have no experience with it, but the insides are the same. you should have similar results with it as well.