Hello all.
Quite simply, this is one of the easiest and simplest mods to make. This would actually work for any 2 AA/AAA flashlight because the batteries provide 3V of power, which is enough to power up most laser diodes.
PLEASE NOTE: THIS MOD CONNECTS THE DIODE DIRECTLY TO THE BATTERIES! YOU COULD POSSIBLY BURN OUT THE DIODE AT ANY MOMENT, POSSIBLY INSTANTLY!!
Requirements:
1. Minimag OBVIOUSLY! ;D
2. Laser Diode of choice... preferably one you do not mind killing...
3. AixiZ chrome module. You will only need the top part of this module (LD holder and lens) and you do not need the cover that goes on top of the collimating lens.
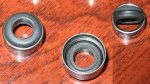
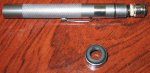
4. Grommet I.D. 9 or 10 mm, O.D around 15 mm with a groove O.D. of 13 to 14 mm.
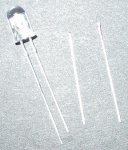
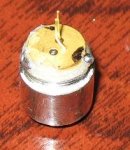
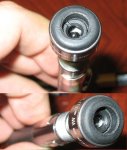
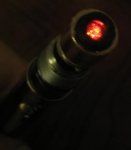
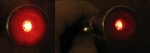
This is very simplistic... All you need to do is open up the MiniMag into little parts and take out the plastic lens and light bulb that comes in it. Keep the batteries and the back cover on and identify the positive and negative terminals in the openings for the light pins. Identify the positive and negative pins on your laser diode. On laser diodes ripped out of a DVD burner, you simply solder on 2 pins that you get from any regular LED (see picture below). On OEM laser diodes the pins will be long enough such that you can just stick them into the pin socket. Attach the laser diode into the AixiZ module and adjust the pins such that they are as far apart as the openings on the MiniMag. Attach the collimating optic onto the AixiZ module. Place the laser diode into the pins, and if the batteries are in place, the laser should be operational at this point.
The convenience of the fact that the pin base on the MiniMag is free-rotating makes it very easy for the grommet to work flawlessly. The grommet's outside diameter should be large enough but small enough to fit in the MiniMag head, and with a groove that allows it to be tightly fit on the little groove that was made to hold the original plastic lens in place. The grommet's internal diameter should be smaller than the chrome module's diameter, but larger than the plastic collimator's diameter as to not turn the lens and take the laser out of focus when you turn it on and off. The way I personally went about doing this is to get a grommet with an inside diameter just large enough to fit the collimating lens and shaved a little of it off with an exacto knife. The good thing about this is that you allow for the maximum possible hold on the chrome module so the grommet doesn't slip past the module and let the laser arbitrarily turn on
If you have done all these parts properly, or even remotely correctly, this mod would be a success. This is a very easy and very simple mod. Another reason I like it very much is that you can always take the laser diode out and snap in the light bulb that is hidden in the cap and you Mag is back into action
Now for the pictures...
Good luck all and ask questions;
DDL
Quite simply, this is one of the easiest and simplest mods to make. This would actually work for any 2 AA/AAA flashlight because the batteries provide 3V of power, which is enough to power up most laser diodes.
PLEASE NOTE: THIS MOD CONNECTS THE DIODE DIRECTLY TO THE BATTERIES! YOU COULD POSSIBLY BURN OUT THE DIODE AT ANY MOMENT, POSSIBLY INSTANTLY!!
Requirements:
1. Minimag OBVIOUSLY! ;D
2. Laser Diode of choice... preferably one you do not mind killing...
3. AixiZ chrome module. You will only need the top part of this module (LD holder and lens) and you do not need the cover that goes on top of the collimating lens.
4. Grommet I.D. 9 or 10 mm, O.D around 15 mm with a groove O.D. of 13 to 14 mm.
This is very simplistic... All you need to do is open up the MiniMag into little parts and take out the plastic lens and light bulb that comes in it. Keep the batteries and the back cover on and identify the positive and negative terminals in the openings for the light pins. Identify the positive and negative pins on your laser diode. On laser diodes ripped out of a DVD burner, you simply solder on 2 pins that you get from any regular LED (see picture below). On OEM laser diodes the pins will be long enough such that you can just stick them into the pin socket. Attach the laser diode into the AixiZ module and adjust the pins such that they are as far apart as the openings on the MiniMag. Attach the collimating optic onto the AixiZ module. Place the laser diode into the pins, and if the batteries are in place, the laser should be operational at this point.
The convenience of the fact that the pin base on the MiniMag is free-rotating makes it very easy for the grommet to work flawlessly. The grommet's outside diameter should be large enough but small enough to fit in the MiniMag head, and with a groove that allows it to be tightly fit on the little groove that was made to hold the original plastic lens in place. The grommet's internal diameter should be smaller than the chrome module's diameter, but larger than the plastic collimator's diameter as to not turn the lens and take the laser out of focus when you turn it on and off. The way I personally went about doing this is to get a grommet with an inside diameter just large enough to fit the collimating lens and shaved a little of it off with an exacto knife. The good thing about this is that you allow for the maximum possible hold on the chrome module so the grommet doesn't slip past the module and let the laser arbitrarily turn on
If you have done all these parts properly, or even remotely correctly, this mod would be a success. This is a very easy and very simple mod. Another reason I like it very much is that you can always take the laser diode out and snap in the light bulb that is hidden in the cap and you Mag is back into action
Now for the pictures...
Good luck all and ask questions;
DDL