

- Joined
- Mar 22, 2011
- Messages
- 791
- Points
- 0
Hey all, I figured since I'll be waiting a few weeks for my green modules to come in and my friend and I to meet up so he can give me his broken DVD Burner, I'd start a thread about this build I've been planning. Maybe you can all help me out with tips and ideas ")
I am not aiming to build a burning yellow laser, but if it ends up being able to do so, that's a plus! The way I'm going to determine power is all based upon the green modules power. I ordered some cheap NewWish style pens today and will use the most powerful one's module and then assemble a red module approximately 4 times the strength of it to get a good mix. I am probably going to use a Groove2 for it so I can adjust the output, via the pot, so the colors are in a good ratio. My original goal was to have a 50mW green with a 200mW red, but I doubt the NewWish Pens will be close to that so at best it will be 30mW:120mW, but I'm not going to be crushed if its lower than that
So I've wanted to build a yellow laser for a long time now. Someone wanted me to build them a PHR-803 laser and I figured, "Why let the optics go to waste" and took them out. I remembered hearing about how Jayrob used them to make a yellow pointer.
Anyway I really like using aluminum boxes for laser hosts. They're just so shiny and cool looking. So I picked up some parts at RadioShack for the "non-laser" part of the build. This is what I have so far...
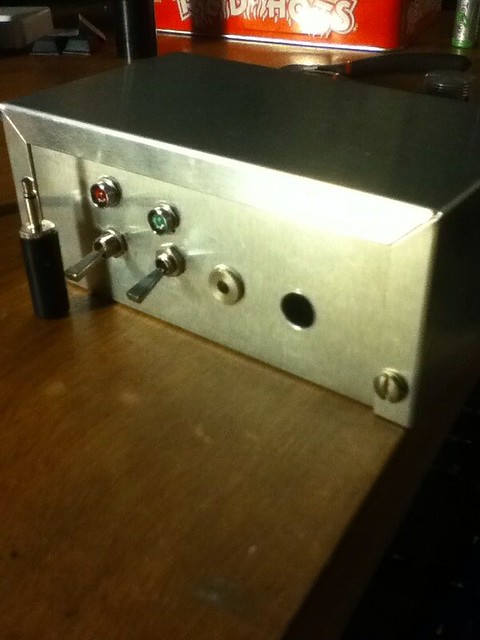
I'm going to use these two toggle switches to choose what colors are being put out by this laser set up. They will obviously be wired with their corresponding light color to indicate what color is being "lased". Yes I know the LED's are a tad off center and it does bug me, haha, but oh well it's always something! You'll notice there is an audio jack and plug which, you guessed it, is an incorporated safety key. Mainly for peace of mind so I don't have to worry leaving it in my room when people who don't fully appreciate the work and safety practices we all put into these are around.
Also there is an empty hole! But that just needs to be filed out a little bit to fit my DC Jack I'm going to use. I don't yet know if I want to run it off of a 9V supply or Li-ions yet, but this option lets me choose later on
So that's the externals... Here is an MS Paint diagram of where I am going to put the actual lasers.
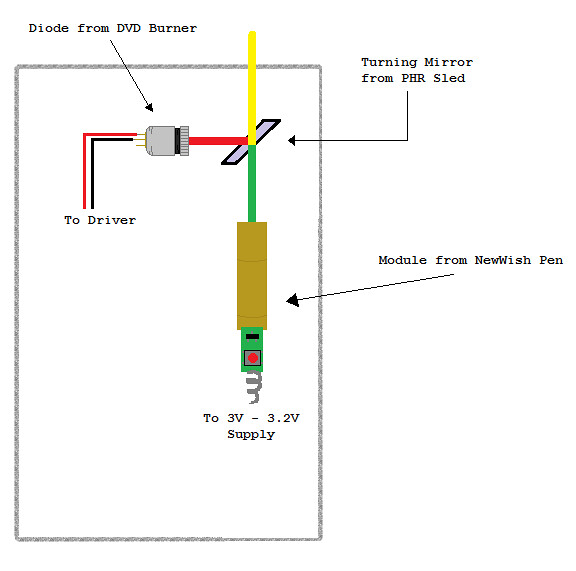
Pretty basic, but I felt like MS-ing something!
Anyway I would like to know any suggestions or ideas anyone has to help me on this.
Here are some build tips I've sort of come up with that I'll try to use for the construction and actual alignment.
- Use fog to help align the beam
- Mount the laser modules in such a way to prevent conflicting electrical connection between cases. (The green modules + case and the red modules - case)
- Don't put the modules too close to the turning mirror
I have some questions though that I would much appreciate being answered.
- In regards to the power supply, can i use 1N400x diodes to drop the voltage, or would LM317 Voltage Regulators prove more handy?
- What would you recommend for power? Wall Supply or Li-Ions connected externally via the DC Jack?
- What is the best adhesive material to use when mounting the mirror and modules? I have been thinking of using some thermal adhesive but will that stick enough?
Thanks for looking at my thread I hope you all like it and the parts come soon! I will update with photos as I go along and then eventually turn this into a thread, hopefully, about the completed laser!
I am not aiming to build a burning yellow laser, but if it ends up being able to do so, that's a plus! The way I'm going to determine power is all based upon the green modules power. I ordered some cheap NewWish style pens today and will use the most powerful one's module and then assemble a red module approximately 4 times the strength of it to get a good mix. I am probably going to use a Groove2 for it so I can adjust the output, via the pot, so the colors are in a good ratio. My original goal was to have a 50mW green with a 200mW red, but I doubt the NewWish Pens will be close to that so at best it will be 30mW:120mW, but I'm not going to be crushed if its lower than that
So I've wanted to build a yellow laser for a long time now. Someone wanted me to build them a PHR-803 laser and I figured, "Why let the optics go to waste" and took them out. I remembered hearing about how Jayrob used them to make a yellow pointer.
Anyway I really like using aluminum boxes for laser hosts. They're just so shiny and cool looking. So I picked up some parts at RadioShack for the "non-laser" part of the build. This is what I have so far...
I'm going to use these two toggle switches to choose what colors are being put out by this laser set up. They will obviously be wired with their corresponding light color to indicate what color is being "lased". Yes I know the LED's are a tad off center and it does bug me, haha, but oh well it's always something! You'll notice there is an audio jack and plug which, you guessed it, is an incorporated safety key. Mainly for peace of mind so I don't have to worry leaving it in my room when people who don't fully appreciate the work and safety practices we all put into these are around.
Also there is an empty hole! But that just needs to be filed out a little bit to fit my DC Jack I'm going to use. I don't yet know if I want to run it off of a 9V supply or Li-ions yet, but this option lets me choose later on
So that's the externals... Here is an MS Paint diagram of where I am going to put the actual lasers.
Pretty basic, but I felt like MS-ing something!
Anyway I would like to know any suggestions or ideas anyone has to help me on this.
Here are some build tips I've sort of come up with that I'll try to use for the construction and actual alignment.
- Use fog to help align the beam
- Mount the laser modules in such a way to prevent conflicting electrical connection between cases. (The green modules + case and the red modules - case)
- Don't put the modules too close to the turning mirror
I have some questions though that I would much appreciate being answered.
- In regards to the power supply, can i use 1N400x diodes to drop the voltage, or would LM317 Voltage Regulators prove more handy?
- What would you recommend for power? Wall Supply or Li-Ions connected externally via the DC Jack?
- What is the best adhesive material to use when mounting the mirror and modules? I have been thinking of using some thermal adhesive but will that stick enough?
Thanks for looking at my thread
I hope you all like it and the parts come soon! I will update with photos as I go along and then eventually turn this into a thread, hopefully, about the completed laser!


