Welcome to Laser Pointer Forums - discuss green laser pointers, blue laser pointers, and all types of lasers

LPF Donation via Stripe | LPF Donation - Other Methods

Links below open in new window

ArcticMyst Security by Avery

7 color fully adjustable

Joined
May 10, 2009
Messages
379
Points
28
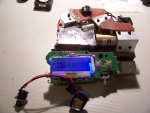
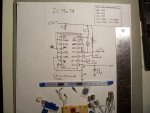
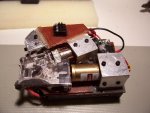
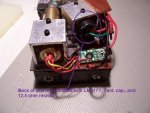
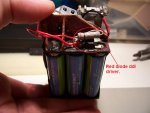
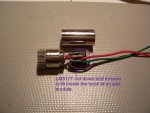
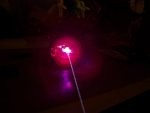
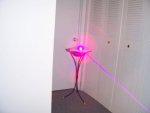
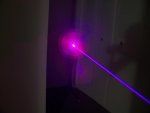
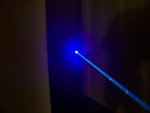
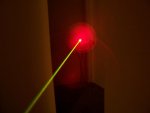
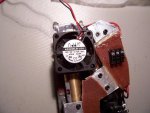
For my second 7 color laser I wanted to not only reduce the size but also have full adjustment capabilities as well as the ability to easily replace any of the lasers. So the cheapest and easiest way I was able to do this was with 3/4" alum. square tube. I don't have any proper machining tools so I'm doing everything by hand with drill, hack saw, file, etc. The host/case is still in the works but it will incorporate polished alum. and carbon fiber. Here are the pics, please reply with questions, comments, and suggestions! Thanks for looking.
 

Attachments

  • 7color24adjst.jpg
    7color24adjst.jpg
    132.7 KB · Views: 7,753
  • 7color24adjst2.jpg
    7color24adjst2.jpg
    132.9 KB · Views: 279
  • 7color24adjst3.jpg
    7color24adjst3.jpg
    104.1 KB · Views: 270
  • 7color24adjst4.jpg
    7color24adjst4.jpg
    143.4 KB · Views: 374
  • 7color24adjst5.jpg
    7color24adjst5.jpg
    53.4 KB · Views: 303


Joined
Jun 28, 2007
Messages
3,443
Points
63
Hey looks like it get's the job done, and I admire the ability to do it with less than a complete machine shop too! btw, can you manage more pics and beam shots? -Glenn
 

jayrob

0
Joined
Sep 21, 2007
Messages
9,862
Points
113
That's a pretty good idea for adjustments, because once you get them exactly where you want them, they will not move at all...

Good job squeezing everything into that small of a package!
Jay
 
Joined
May 10, 2009
Messages
379
Points
28
More pictures for scopeguy. All pics taken with NO smoke of any kind, and were only resized. The flash went off accidently in a couple pics but I thought they looked cool so I posted them.

Thanks Jay, yes your correct once they are set in position its solid as a rock!

I also added a charging port on the rear right side.

white.jpgwhitewithflash.jpg
 

Attachments

  • magentawithflash.jpg
    magentawithflash.jpg
    53.4 KB · Views: 216
  • magenta(shaky).jpg
    magenta(shaky).jpg
    53.7 KB · Views: 229
  • aqua(littlebitshaky).jpg
    aqua(littlebitshaky).jpg
    44.2 KB · Views: 231
  • yellow.jpg
    yellow.jpg
    45.7 KB · Views: 237
  • goodfan.jpg
    goodfan.jpg
    127 KB · Views: 223
Last edited:
Joined
May 4, 2009
Messages
2,237
Points
83
The second to last pic in the above post is awesome! Red bloom, yellow beam, and a green halo :D :kewlpics:
 
Joined
Jun 15, 2009
Messages
503
Points
0
good job.
you know what would be the ultimate though being able to adjust the brightness of each individual diode. dont know how possible that is but you would have alot more colours. and if you used blue instead of blu ray than the only color you couldnt have is black
 
Joined
Mar 8, 2009
Messages
710
Points
0
You could simply make the pots of the drivers accessible from outside (use pots with knobs). You'd probably need a logarithmic or even exponential pot to get a good brightness control - room for research here. You'd use a fixed resistor to determine the max current and the pot in series with such a value that at max resistance, the diode would just start to lase.
 
Joined
May 10, 2009
Messages
379
Points
28
It would be very nice to be able to adjust the brightness individually. It can be done quite easily for the but whenever I have put a diode on a "dimmer" in the past it has sacrificed life of the diode substantially, however I'm not sure if that was bc the dimmer's quality but I always use a limiting resistor. I'm not sure over all but It's been my experience that it's in the diode's best interest to run it at as close to the same current for the entirety of it's life.

I am working on adding a small speaker with surface mirror from a cell phone that could be switched into the beam path similar to rog's spiro. Only the speaker is connected to an onboard mp3 w/usb connect. This would allow me to project an image of the sound over the laser.
 

Attachments

  • Lasermp3.jpg
    Lasermp3.jpg
    133.1 KB · Views: 199
Joined
Mar 8, 2009
Messages
710
Points
0
Hmmm... somebody else reported something similar a while ago, that after running a PHR (I think) at 90mA for some time, it tends to die quickly after increasing to 120mA.

In that case, using a PWM modulation (i.e. switching the diode on&off at some kHz) should work, but cause some overhead with regards to the required electronics.

How did you dim - just by varying the current-sense pot, or some other method? Also I'd leave off any caps and diodes that are in the circuit diagrams floating around here as they might introduce instabilities in the IC circuitry.
 
Joined
Feb 28, 2008
Messages
1,809
Points
0
I believe the best way to control brightness of the laser would be using an analog driver, to get precise current levels ranging over certain levels. I hear Dr Lava flexmod is a great one, I plan on buying 2 for a scanner I'm building.

-Kendall
 
Joined
May 10, 2009
Messages
379
Points
28
Sorry for the delayed response, very busy lately.

dr-ebert, yes I used a current sense pot with limiting resistor(s) a tant. cap across the diode and a 1N4001 diode for reverse pol. protection. Great advise thank you! I just recived all my samples to start on a new driver using the MAX711 IC. I am substituting the R1 for a pot with limiting resistor for v.adjust nd adding a pot on the output as well. Any advise on this project would be greatly appriciated.

electron, thank you for your interest and comment:yh:

sk8er4514, thanks for the tip, drlava's driver is really good. I'm on a pretty limited budget lately bc I'm trying to load up on the all classes I can afford @ the college. So I'm trying to build all my own circuits using some samples and low cost components from a local surplus warehouse called Skycraft.
 

Attachments

  • driverproject.jpg
    driverproject.jpg
    138.8 KB · Views: 236


Top