Jules
0
- Joined
- May 26, 2008
- Messages
- 89
- Points
- 0


styropyro said:Payday is in a couple of days for me so I'll pick up probably 3-5 depending on what mood I'm in
Is it just me or do you guys find it hilarious that we buy perfectly functioning media drives and rip them apart for a little component? When new types of optical data storage devices are released I think most of us here get more exited for the laser diodes inside instead on the capability of the new technology ;D
You have to unsolder it.... Try looking at this guide for a red diode. Should be about the same process, but dont quote me on itrubberband said:hey how did you go about taking the pcb off of the back of the diode. i tryed it on the red and failed miserably. i am waiting for my aixiz modules from dx before i can finish so i have some time i just want to do it right.
any help would be awesome
Thanks,
Mitch
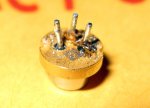
Jules said:Here is what I did. See the pdf for details. I used solder wick and carefully pulled the pcb stuff away. It wasn't elegant and I hope I didn't damage it. A good magnifier is in order here!