Welcome to Laser Pointer Forums - discuss green laser pointers, blue laser pointers, and all types of lasers

LPF Donation via Stripe | LPF Donation - Other Methods

Links below open in new window

ArcticMyst Security by Avery

Ballin led tutu plan needs some help

Lumin

0
Joined
Feb 23, 2011
Messages
37
Points
0
you could combine the battery per light idea with the thread wire plan and hook a couple of lights up in parallel, giving you short 'runs' of lights where you want them...
Batteries for each run can be hidden in small folds of black fabric etc. and single CR2032s (button batteries available on ebay or the $ store near you) are light enough they shouldn't change the flow of the garment much...
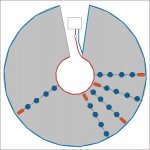
(parallel means all the + sides of the lights (the longer leg) connect to the + side of the battery, all the - to the -, I can draw this if it's unclear)
see how many lights you can light up bright enough per battery (don't forget they'll get a bit dimmer as the batteries drain) and make your runs this many lights long.
Maybe?


Joined
Feb 23, 2011
Messages
58
Points
6
I totally get how to wire them. The positive negative. I was more specifically asking if they needed soldering. I found a decent instructional on how to do it without soldering. So that's under control.

I've really warmed up to the idea of battery packs. I started making the tutu this evening and I think I could easily hide several.

Lumin, I might buy a few CR2032s and do some test runs before I bank on that as my full plan.

I would still love some recommendations on where to buy battery packs. So far my searches have mostly rendered packs that already have a few lights attached to them with thick wiring.
 

Lumin

0
Joined
Feb 23, 2011
Messages
37
Points
0
how about BA2032-ND from DigiKey? They have two pins sticking out (usually for soldering to) and cr2032s click into them nicely... follow the link for a picture, digikey's not the cheapest place but they have lots of selection, if you don't like the one below I'm sure they'll have ones that better fit your project

Digi-Key - BA2032-ND (Manufacturer - BA2032)
 
Joined
Feb 23, 2011
Messages
58
Points
6
It looks like the pack you linked me to is actually pretty cheap.

I think I'm going to look at ones for AA's for the sake of getting a lot more leds on one pack and AA's will probably last longer.

Fantastic!


Thank you all so much. In one day you guys got me where I needed to be.

I'll do my best to remember to get some pictures up here when it's made. And hopefully some of it being amazing at Bonnaroo.

One more time. Thank you.
 

HIMNL9

0
Joined
May 26, 2009
Messages
5,318
Points
0
Cause digikey is already used, i've found these two there: open type and closed type , both can hold 4 AA cells (6V total), or 4 Li-Ion 14500 rechargeable cells (14.5V total).

Using normal alkaline AA cells, you can connect leds in serie of 2, when using Li-Ion cells you can connect them in series of 4 leds (this will give you more duration) ..... ofcourse each serie needs its own resistor, so using series of 4 leds, also half of the resistors needs to be used.

Those two are just examples, there are a lot of different types.

Using solder is the better solution for more robust installation, but you need to decide yourself about this ..... i remember that someone also posted "conductive glue" that maybe can be used with conductive sewing wire, but don't remember who or where now, and really i don't know if it can resist washing machine cycles ..... anyway, spilling beer and similars :)p) on the system will not cause too much problems, at those currents ..... the main risk is about oxidation, if something containing salt or sugar will become spilled on the assembly and then left there for some days (but i suppose this will not happens, anyway ;))

Also, conductive sewing wire is NOT insulated, for its own nature, so must not be crossed, where instead there are copper wires insulated with special paints (also black), that can be crossed where the paint is not removed, if needed.

If you opt for a common battery pack and wired leds, i suppose the better wiring solution can be this one: considering the "tutu" as a cylinder of fabric, for simplicity, place a "ring" of wire around the top of the cylinder, another around the bottom, then wire the series of leds from the top wire to the bottom wire, so you don't need to cross any wire.
 
Joined
Feb 23, 2011
Messages
58
Points
6
I'm thinking the best way to wire them will be vertically since that's how the material will be lined up.

Is there a way to get about 100 (or more) leds on battery packs without needing a minimum of 25 packs? That's going to be way too heavy.

It's unlikely that the wires will cross but if there is better wire for preventing that from being an issue, I'd love more info.
I searched it a bit and came up with a bunch of unrelated garbage.

I've looked into conductive epoxy a little. It's expensive. The conductive glue is super reasonable and I'll probably end up getting some. I don't like to put tutus in the wash. I prefer to hand wash them. Tulle gets really sad looking even after a delicate cycle. So I'd imagine the glue would hold up alright.

Also, these are the leds I'm looking at buying.
200 pcs 5mm straw hat UV LED Wide Angle 1200MCD light - eBay (item 120503214986 end time Mar-02-11 00:46:31 PST)
 

HIMNL9

0
Joined
May 26, 2009
Messages
5,318
Points
0
Those "straw hat" leds are, usually, the ones that have the better visual angle (not illuminating so much as the spot ones, but the light can be seen from a larger angle), so probably they are ok.

As for the connection, i've made a sketch (sorta of), about what i means ..... and in this case, you can probably use also a single battery pack, if you decide to use 14500 Li-Ion rechargeable cells:

attachment.php


Try to imagine the grey part as a "cone" of tulle, seen from the top, where the small side is where you place elastic (or whatever you use for keep it in place), and the larger side is the "floating" border ..... placing a wire around the smaller side and another around the larger side (i drawed them blue and red), then you can connect your led strips, 4 by 4, each strip with its own resistor, from one wire to the other without cross any wire ..... also, no need to keep them straight inline, until they are connected in the right way )in serie, anode with cathode, the anode side to the positive and the cathode side on the negative ..... the resistor can be placed at any end of the serie, or also in the middle, with no problems)

Also, with the leds that you have linked, you can place them flushed on the fabric, bending their pins for keep them better in place, and maybe using some fabric glue, so they face all outside from the fabric at top of it, where all the wires and resistors can be kept under the fabric ..... also, 1/4 W resistors and black wires can be used for minimize the appearence, and in case, using some real permanent black markers (like Pelikan Markana or similars), anything that is not the leds themselves can be colored black for see them the less possible (leds terminals, solder, resistors, anything that must be hidden)
 

Attachments

  • tutu.jpg
    tutu.jpg
    47.2 KB · Views: 888
Joined
Feb 23, 2011
Messages
58
Points
6
That's insanely helpful.

So what you're saying is for illumination as a primary goal, I should get spot leds instead of straw hats?
Would these be better?
100 pcs 5mm UV LED Ultra Bright & 200 pcs Free Resistor - eBay (item 320661051318 end time Feb-24-11 22:07:05 PST)

And you think I can rig 100 (give or take) leds on one battery pack if I use those specific batteries?

I've looked into resistors a little bit and I totally think I can handle that part no problem.

The only trouble with wiring it that way is the "blue" wire. I can't sew it that way.
That part of the tutu is not solid.
It looks more like this.
thebizz.png


I was thinking something along these lines with the yellow meaning I have no idea what to do there.
shitballs.png
 
Joined
Feb 21, 2011
Messages
143
Points
0
I believe the idea is to make the top of your tutu, which goes around your waist the + end of our battery, and to make the bottum, or spot where your diodes end the - lead of your batter, so at the yellow spot you'd place the battery pack, and "wire it" as the + end.
 
Joined
Feb 23, 2011
Messages
58
Points
6
Yeah, I get that.
But I cannot have a ring of wire around the bottom.
It's going to have a finished minimum of 126 strips of 6 inch wide tulle. Those pieces move completely independently.
Through that movement, the wire would probably end up breaking and ruining the whole damn thing.
It simply will not work.

The deal with the yellow spot is I'm illustrating where I don't know how to wire without crossing. That is the waist band. The tulle is sewn onto ribbon there.
 
Last edited:
Joined
Sep 16, 2007
Messages
3,658
Points
113
Might I suggest fiber optics?
Mini Fiber Optic Light | Edmund Scientific
Maybe you can rig up something like that with UV LEDs. The glow would not be super bright from each fiber but it would save space and the fibers are flexible and won't be susceptible to damage from beer.

The way optical fiber works (in layman's terms) is you shine a light in through one side and it comes out the other side. Pretty simple to integrate, I would think.

Some time ago while googling some fiber optic products, I came across a place selling strands of optical fiber that were "notched" along the length so the light would shine not only from the end of the fiber but also from the "notches." It made a more "sparkly" effect.
 
Last edited:
Joined
Feb 23, 2011
Messages
58
Points
6
That's not a terribly bad idea. It could easily be woven through the tulle.
How would you rig up the light so that it would shine through them?

I'm almost certainly sticking with just leds but I still want to hear how you think fiber optics could be made to work.

And really hating to say it, I've always felt like fiber optic lighting was tacky. Though it doesn't mean I'm not willing to consider non classic applications.
 
Joined
Jan 14, 2011
Messages
3,816
Points
63
What you could do, if you are going to have the "strands" of series of diodes like in the diagram you drew, is basically attach two wires going around the circumference of the waist band, and have one be positive and one be negative. Then just hook up all the positive leads from the LEDs to the positive band all the negatives to the negative band, and then just hook *that* up to the battery pack.
 
Joined
Feb 23, 2011
Messages
58
Points
6
That's how I figured it but I don't know how to arrange the wires without them crossing and I can't solder so wire heavily coated in plastic is no bueno.

If HIMNL9 can help me find the lightly coated in paint wire that is safe till you scratch the paint off, I'll have it all sorted.
That and the matter of if I really can get 100 +/- leds running fine on one battery pack.
 
Joined
Jan 14, 2011
Messages
3,816
Points
63
Why can't you solder? You can get a nice, cheapo soldering iron from RadioShack for $8, and it will make for much stronger bonds.

It's the one I have been using, and I can make a tiny, 9mm x 12mm driver from them =p
 
Joined
Feb 23, 2011
Messages
58
Points
6
Because I want to use the lightest weight wire that is sufficient.
I feel like wire coated in a few mm of plastic will be too bulky.
And conductive glue is cheaper.
I don't really just want to buy a piece of equipment I will only use once and have to also buy solder for that will also go unused.

The soldering gun, cheapest solder, and shipping would run me $20.
The cheapest conductive glue with shipping would be $10.


Top